Installing a card reader for vending machines is the definitive turning point between running a traditional route and managing a modern, digital retail network. For most South African operators, the decision to go cashless isn’t the hard part—it is the technical “how” that stalls the process. You know the revenue is sitting there, locked behind the “Tap to Pay” preferences of your customers, but the path from a cash-only machine to a fully integrated digital unit often feels like a maze of specialized cables and communication protocols.
This guide is designed to cut through that technical noise. We aren’t here to discuss the broad merits of digital payments; we are here to get under the hood of your equipment. Whether you are dealing with modern knockout plates or retrofitting a legacy unit that requires a bit of industrial drilling, this framework provides the exact steps needed to verify your MDB compatibility and secure your hardware.
By the time you finish this guide, the “black box” of vending electronics will be a clear, manageable system, allowing you to stop troubleshooting your hardware and start scaling your operations.
Pre-Installation Check: Verifying Compatibility for a Card Reader for Vending Machines
Before you purchase any hardware, your first priority is to verify that your equipment can support a modern cashless payment terminal. Conducting a thorough compatibility assessment early on helps you avoid a substantial waste of time and financial resources later. Confirming these technical requirements ensures that your chosen card reader for vending machines integrates seamlessly with your current setup.
MDB Compliance: The 6-Pin Connector Standard
The most important factor to consider is whether your equipment is Multi-Drop Bus (MDB) compliant. Think of MDB as a universal language that allows the central controller of the equipment to communicate with various payment systems. This protocol ensures that your coin mechanism, bill validator, and card reader for vending machines all work together in perfect harmony.
- Verification Method: Access the vending machine’s interior and inspect the wiring connected to the existing coin and bill validation units.
- Identify the 6-pin Connector: An MDB-compliant machine utilizes a standard 6-pin plug. The presence of this connector indicates a high likelihood of compatibility.
- Addressing 9-pin Connectors: Certain legacy machines employ a 9-pin connector. These are generally not MDB-compliant and require a specialised MDB adapter, which introduces additional complexity and cost to the installation.
Software and Firmware Validation
Finding a compatible physical port is just the first step toward preparing your equipment. Your machine’s internal firmware must also possess the capability to identify and process commands from a cashless payment terminal. It is important to remember that physical compatibility does not always guarantee a successful functional integration.
Action Step: Before you invest in a card reader for vending machines, reach out to the manufacturer directly. Provide them with your specific model and serial number to confirm MDB support and determine if any firmware updates are required to successfully integrate a modern payment device.
The Step-by-Step Hardware Installation Process
After confirming compatibility and receiving your card reader kit, you can proceed with the physical installation. This process typically requires 30-60 minutes for an initial retrofit.
Safety Protocol: Disconnect the vending machine entirely from its power source before commencing any work.
Step 1: Mounting the Card Reader
The mounting procedure varies based on the machine’s design generation.
For Modern Machines (with Knockout Plates)
Newer vending machines are frequently engineered to accommodate cashless upgrades.
- Locate the Knockout Plate: Identify the pre-cut, removable metal or plastic plate on the machine’s exterior, typically positioned near the bill or coin acceptor.
- Remove the Plate: Utilise a screwdriver or pliers to carefully detach the plate.
- Attach the Bezel: The card reader kit includes a mounting plate or bezel. Fit this component into the opening and secure it with the supplied screws.
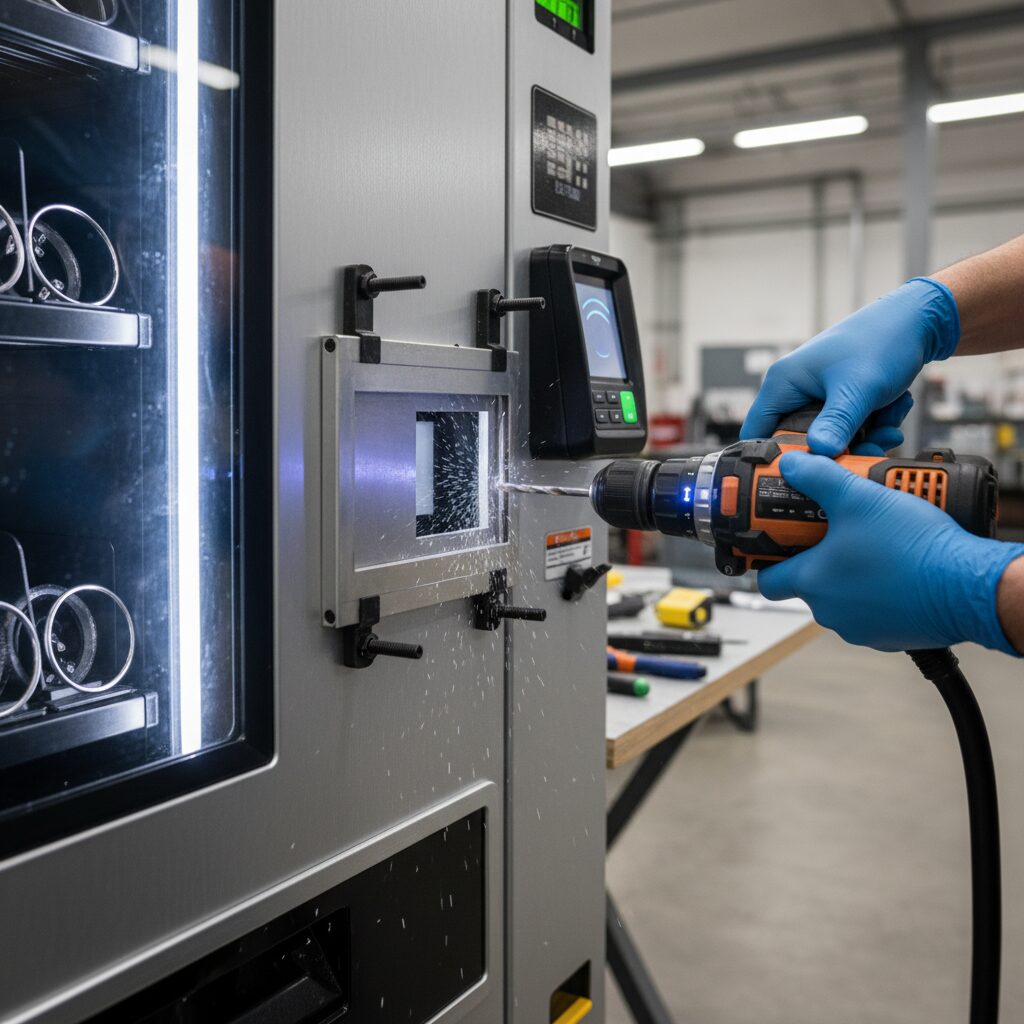
For Older Machines (Requiring Drilling)
If no knockout plate is present, an opening must be created manually.
- Utilise the Drill Template: Your kit should contain a paper drill guide. Affix this template to the selected location on the machine’s exterior.
- Mark Hole Positions: Use a marker to precisely indicate the positions for the mounting holes and central aperture.
- Drill the Openings: Employing an industrial-grade drill with the specified bit size (confirm with your kit’s installation manual), carefully drill the marked holes.
- Secure the Backplate: Insert the mounting backplate from the kit into the newly created opening and fasten it securely with the provided screws.
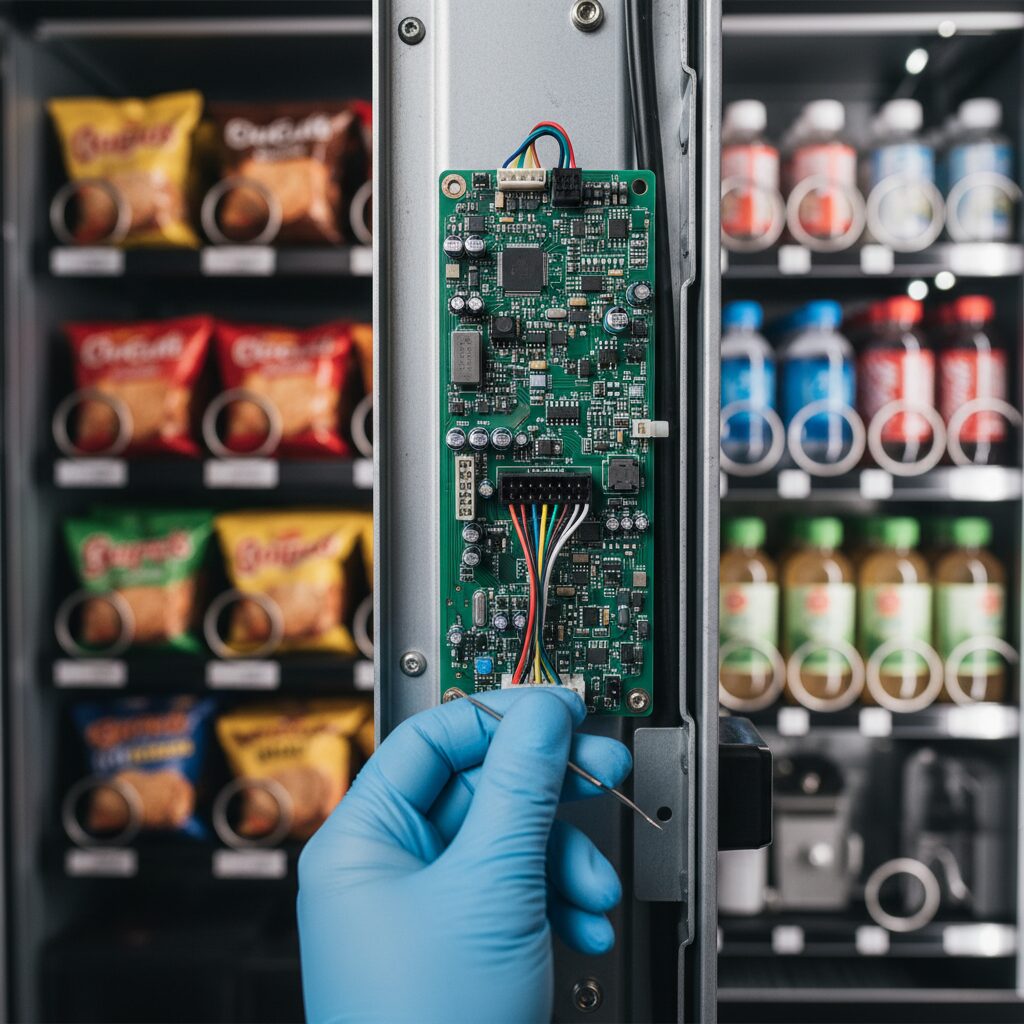
Step 2: Internal Cabling and Connections
With the reader securely mounted, the next phase is to integrate it with the machine’s control systems.
- Route the Cables: Feed the card reader’s MDB and antenna cables through the opening into the machine’s interior.
- Locate the Controller Board: The main vending machine controller is typically situated behind the coin mechanism.
- Connect the MDB Cable: Disconnect the existing MDB cable from the coin mechanism. Connect the MDB splitter or harness from your kit to the port. Reconnect the coin mechanism and the new card reader cable into the splitter, establishing a unified communication bus.
- Connect the DEX Cable: If your system utilises it, connect the DEX (Data Exchange) cable to its designated port on the controller board. This connection is critical for accessing detailed sales data and operational analytics.
- Mount the Antenna: Secure the cellular antenna to a flat, unobstructed internal surface, such as the inner side of the door. Ensure its placement does not interfere with any dispensing mechanisms or moving parts.
Step 3: System Power-Up and Final Testing
- Secure Wiring: Use cable ties to manage and secure all internal wiring, ensuring it is clear of any moving components.
- Power On: Reconnect the vending machine to its main power source.
- Verify Reader Status: The card reader should power on, which is typically indicated by an illuminated LED or an initialisation message on its display. A successful startup is often confirmed with an audible tone.
- Perform a Test Transaction: Utilise a credit card or mobile payment application to execute a test purchase. This validates that the hardware is correctly installed and communicating effectively with the payment gateway.

Troubleshooting Common Installation Issues
Even with careful preparation, you might encounter a few hurdles during the process. The following section outlines frequent challenges and provides effective solutions to help you get your card reader for vending machines back on track.
| Issue | Solution |
|---|---|
| The card reader for vending machines fails to power on. | The MDB cable connection is the most frequent cause. Verify that the cable is securely seated at the controller, the splitter, and the rear of the device. |
| Transactions are repeatedly declined during testing. | This typically indicates a weak cellular signal. Reposition the antenna to a higher point or a different location within the machine to improve signal strength. |
| The vending machine does not identify the reader. | This is often caused by a firmware incompatibility. Reach out to your manufacturer to confirm you have the latest software version that supports third-party cashless devices. |
Operational Best Practices for South African Vending Operators
To get the most out of your new hardware and ensure a smooth transition to cashless payments, following a few industry standards is essential. These operational best practices will help you protect your investment and maintain a high level of service for your customers.
-
Partner with Authorized Local Suppliers: Secure your hardware through established South African distributors or local partners of global brands. This approach guarantees access to localized technical support and streamlines your accounting with billing in ZAR.
-
Opt for Professional Installation Services: If the technical setup feels overwhelming, hiring a professional technician is a wise investment. Expert assistance ensures the job is done right the first time and protects your equipment from accidental damage.
-
Utilize Your Management Platform: Your hardware is just one piece of a successful business strategy. To maximize your return on investment, you should actively monitor sales data and track device performance through the backend management platform provided with your card reader for vending machines.
-
Commit to Routine Maintenance: During your regular service visits, perform a quick visual inspection of all MDB cable connections to ensure they remain firm. Keeping the contactless interface and screen clean preserves the functionality of your card reader for vending machines and maintains a professional image for your customers.
If You Are Ready to Move Beyond the Technical Setup
While understanding the technical requirements of a card reader for vending machines is vital for any operator, managing the hardware is only half the battle. Once your machines are physically connected, you need a reliable ecosystem that ensures every “tap” translates into a successful, settled transaction without constant manual oversight.
If your goal is to minimize technical downtime and maximize your revenue through a stable, local payment gateway, then a standalone retrofit can only take you so far. When you require a system that offers robust South African support, simplified ZAR billing, and real-time sales analytics, you need a more integrated approach.
That is where Eezipay fits. We provide the hardware and the backend infrastructure specifically designed for the South African landscape, ensuring your transition to cashless is both profitable and permanent.
- The Hardware Integration: We provide MDB-compliant card readers designed to be mounted directly onto your machines. These are rugged, unattended devices built for “Tap to Pay” functionality.
- The Eezipay Ecosystem: This is the real “solution.” It is the software and payment gateway that ensures the money swiped at the machine actually lands in your bank account, tracked by a management platform that talks to your machine via the MDB and DEX protocols.
- The Mobile Element: The MPT is often used by vending operators as a “backup” or for side-sales at events, but for the machine itself, the integrated reader is the primary tool.
Ready to upgrade your fleet?
- Explore Our Systems: Discover how Eezipay integrates hardware and payments into a unified solution
- Confirm Compatibility: Book a 15-minute call to discuss your machine’s firmware and hardware needs
Frequently Asked Questions
How long does a standard installation take?
For a modern machine with a pre-cut knockout plate, a technical installation typically takes between 30 and 45 minutes. If the machine is older and requires manual drilling and custom mounting, you should set aside roughly 60 to 90 minutes to ensure the wiring is properly secured and tested.
Will a card reader work on a machine that doesn’t have MDB?
Direct integration is not possible without an MDB-compliant controller. However, you can often use a specialized MDB converter kit for legacy machines. Keep in mind that this adds a layer of technical complexity and may require a firmware overhaul to ensure the card reader for vending machines communicates correctly with the existing hardware.
Does the card reader require its own power source?
No, a standard MDB-compliant reader draws its power directly from the vending machine’s central controller board via the 6-pin MDB cable. This is why verifying your power connection is the first step in troubleshooting any unit that fails to initialize.
What happens if the cellular signal is weak inside a building?
If the internal antenna cannot reach a stable GPRS or LTE signal, you can install an external high-gain antenna. These are usually mounted on the top or side of the machine and connected via a long coax cable, allowing you to bypass signal interference from thick walls or metal structures.
Future-Proofing Your Vending Business
Upgrading your fleet with a card reader for vending machines is more than just a technical checkbox. It is the moment your machines stop being “silent boxes” and start becoming data-driven assets that work as hard as you do. Once the MDB cables are clicked into place and your firmware is synced, the real shift begins.
You move from wondering if a machine is empty or jammed to knowing exactly how your business is performing from your phone. In the South African market, where speed and reliability are everything, that visibility is what separates a struggling route from a scalable one.
The technical installation is the foundation, but the ecosystem you build on top of it is what actually grows your revenue. If you want to dive deeper into the strategic side of running a digital-first business, read our Cashless Vending Machine: The Ultimate Operator’s Manual. It covers how to leverage this new technology to secure your margins and reclaim your time.
Now that you have the framework to get your hardware running, it is time to focus on the bigger picture—making sure every “tap” is seamless, secure, and simple for your customers.
")
")