Radisson User Guides
Radisson – Portal – Staff User Guide
Welcome to the Radisson Portal User Guide for Cashless Community. Inside, you’ll find easy step-by-step instructions on how to view your current balance, check transaction statements, manage your registered cards, and update your card pin. If you need help at any point, please contact support@eezipay.com.
1. URL of Portal
You can log into the portal by navigating to the following URL, cashlesscommunity.eezipay.co.za

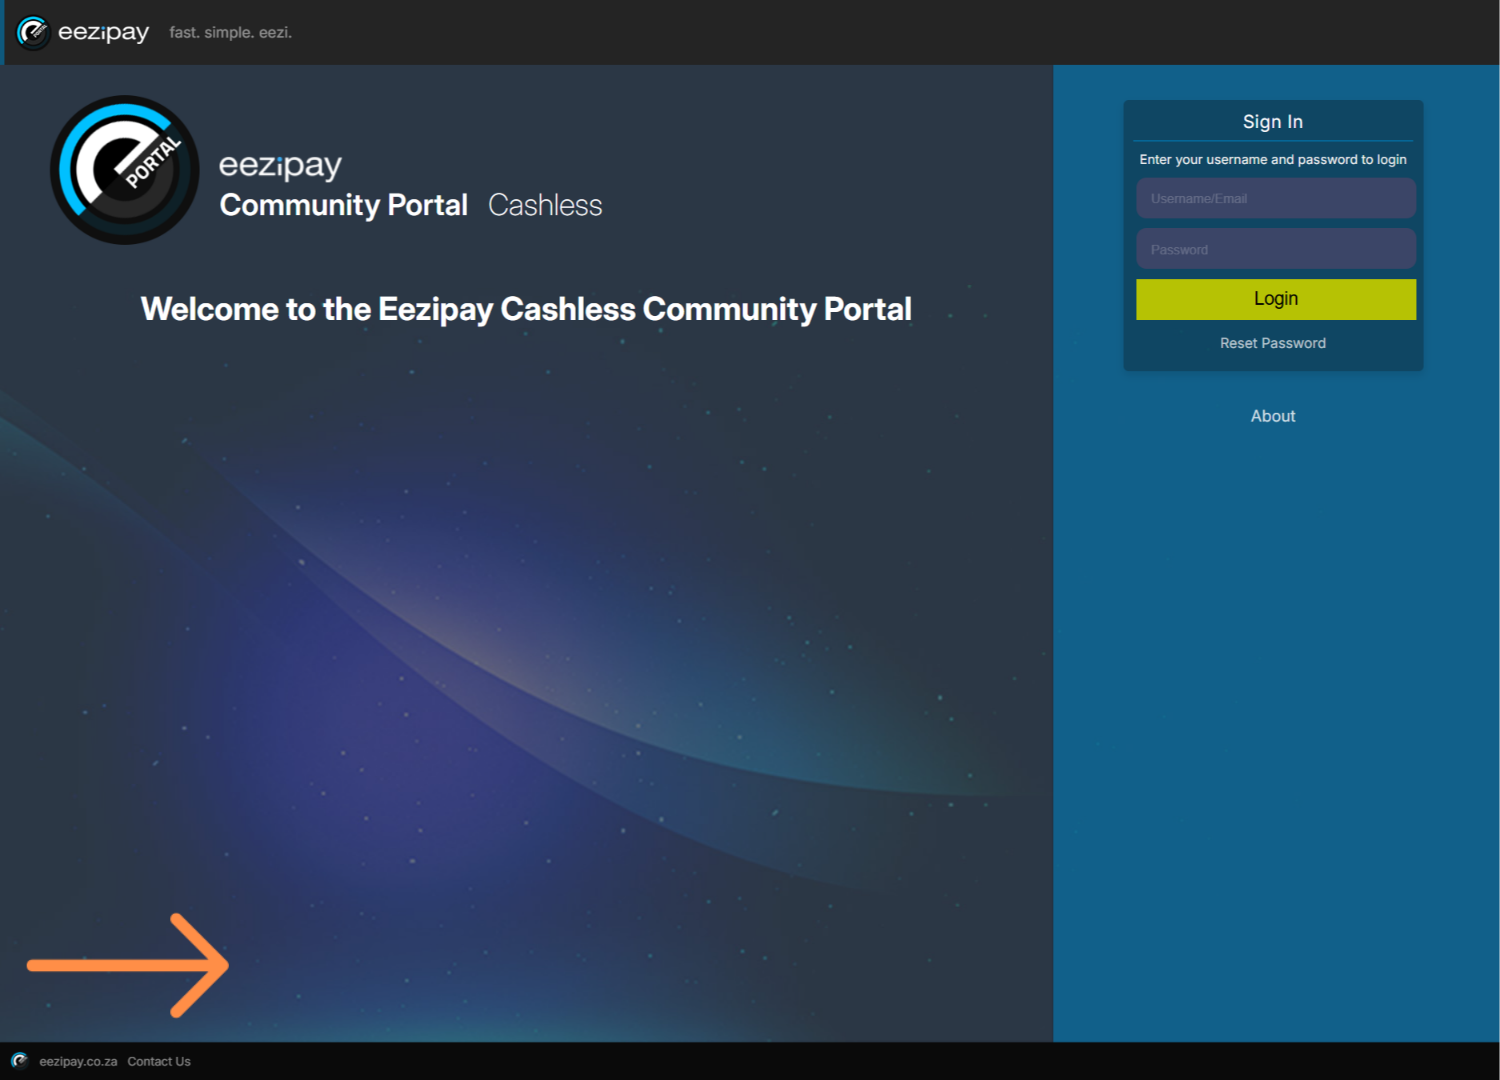
2. How to Log into the Cashless Community Portal
Enter your Username and Password, followed by clicking on the Login button.
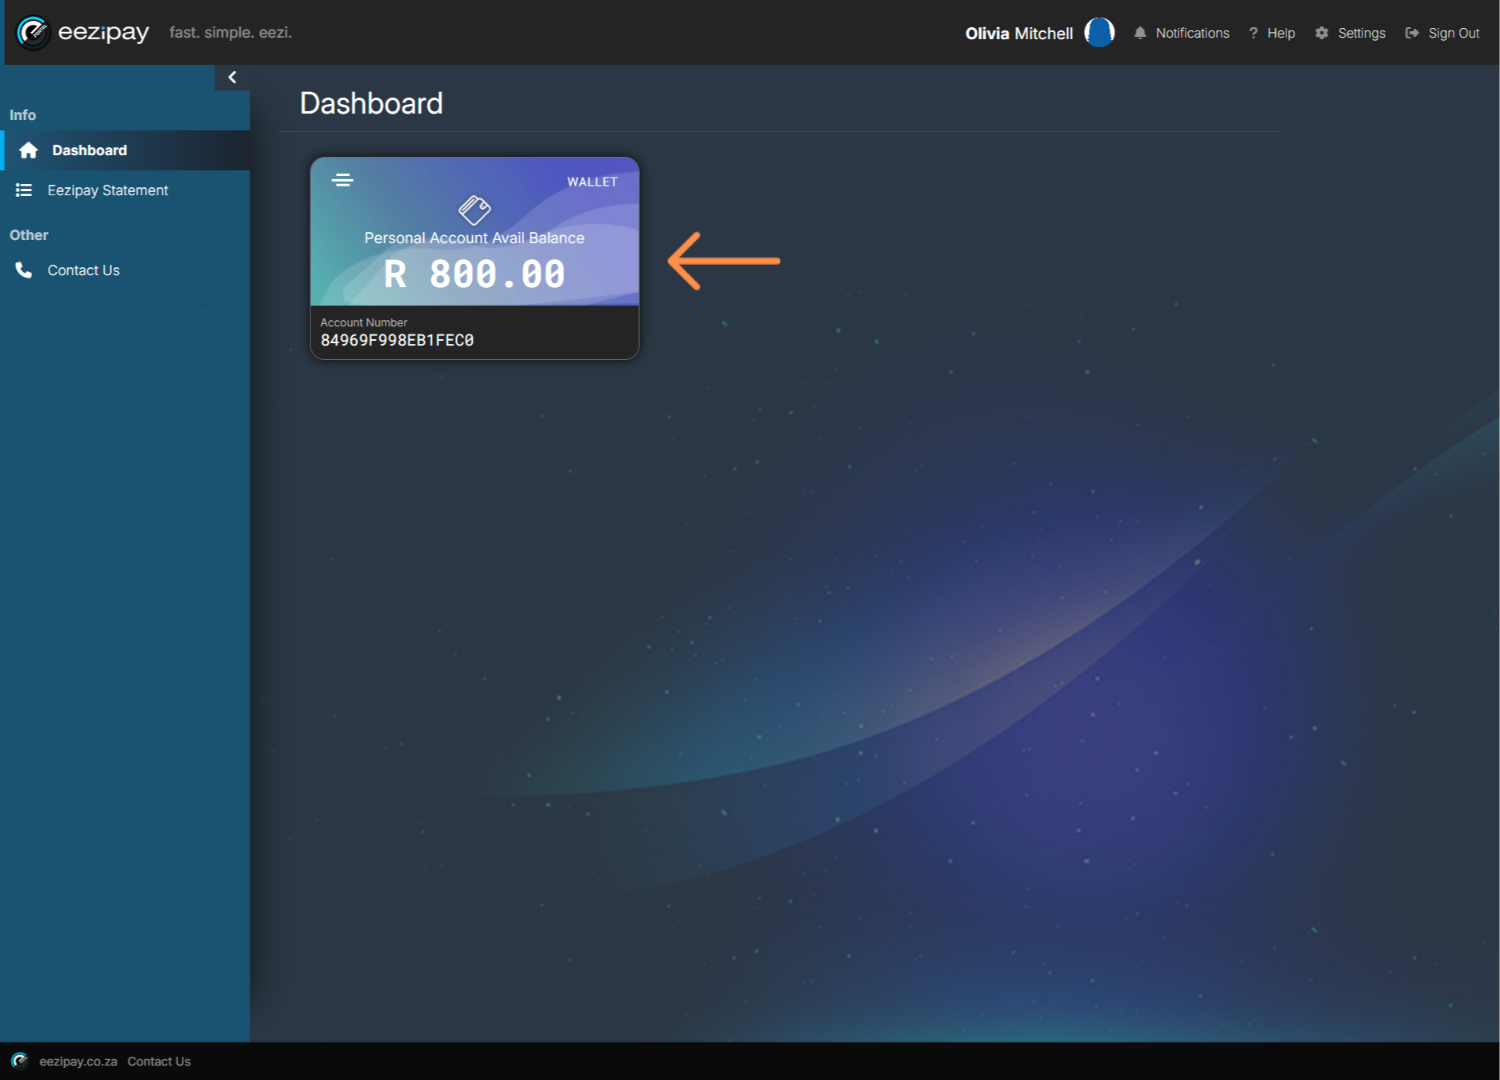
3. Dashboard
After logging in, you will be welcomed by the dashboard. The first thing you will see is your account balance. This is the amount of money you have left to spend for the month.

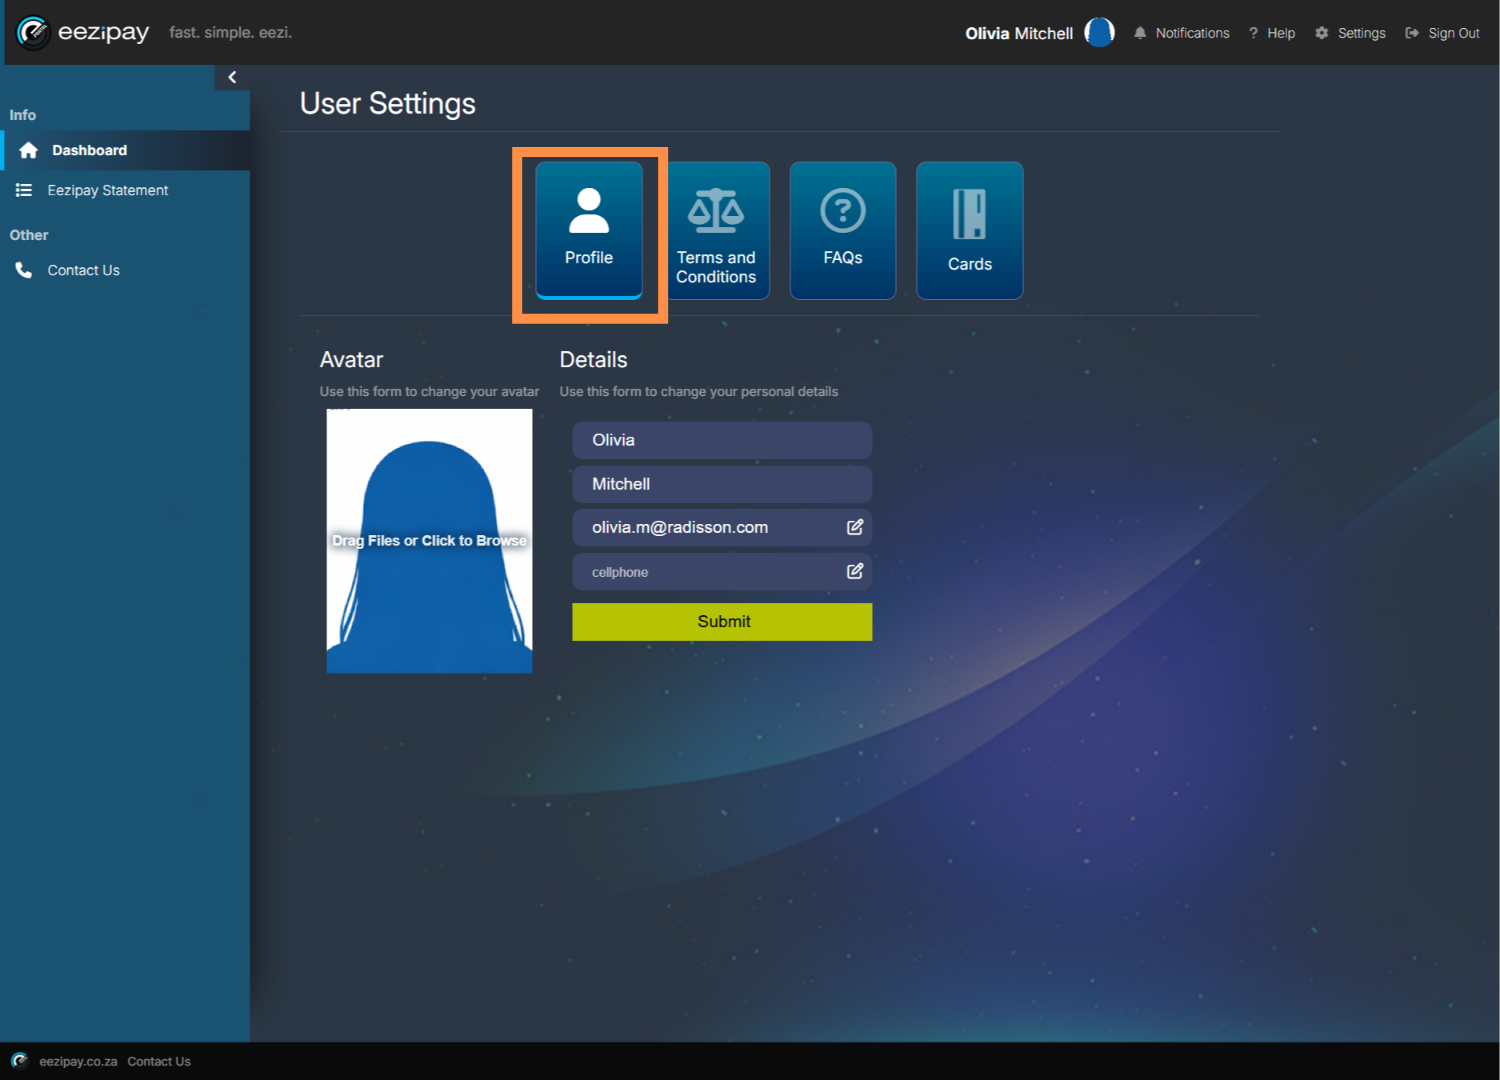
4. How to Manage Your Card & Settings
To manage your card and other settings, click on the Settings option located in the top right-hand corner of the screen.

5. User Settings
In user settings, you can update your Profile, view our Terms and Conditions, see the FAQs, and manage your cards
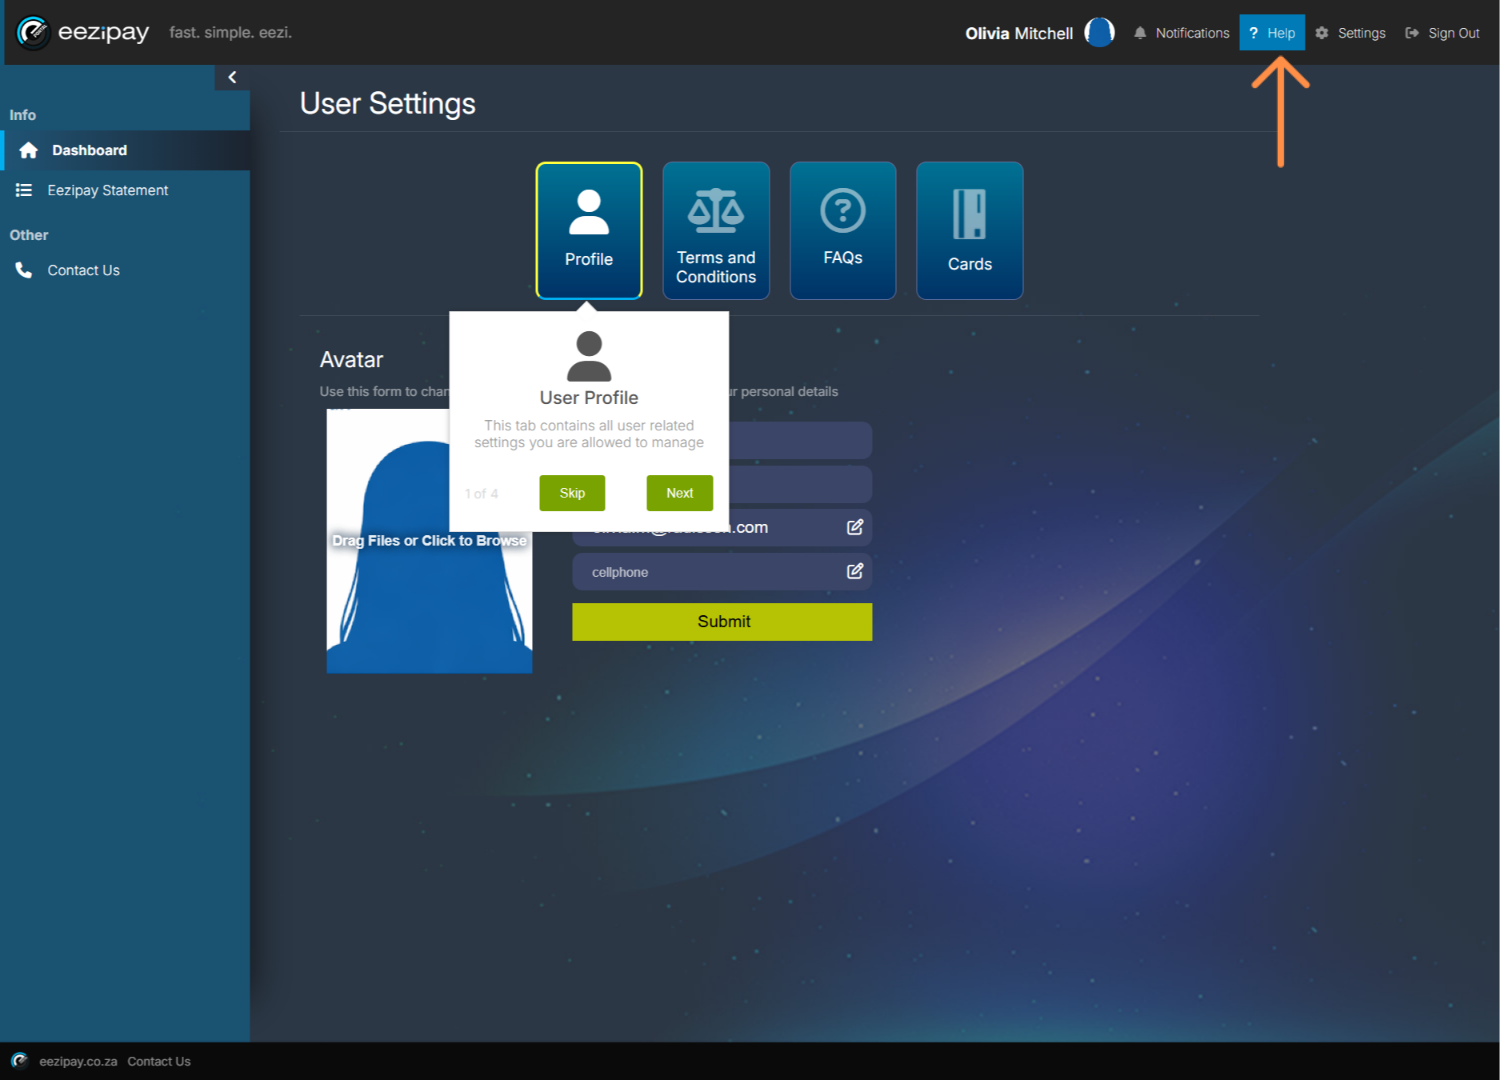
6. Help Tooltips
If you click on the Help button at the top right of the screen, tooltips will explain each aspect of the platform.
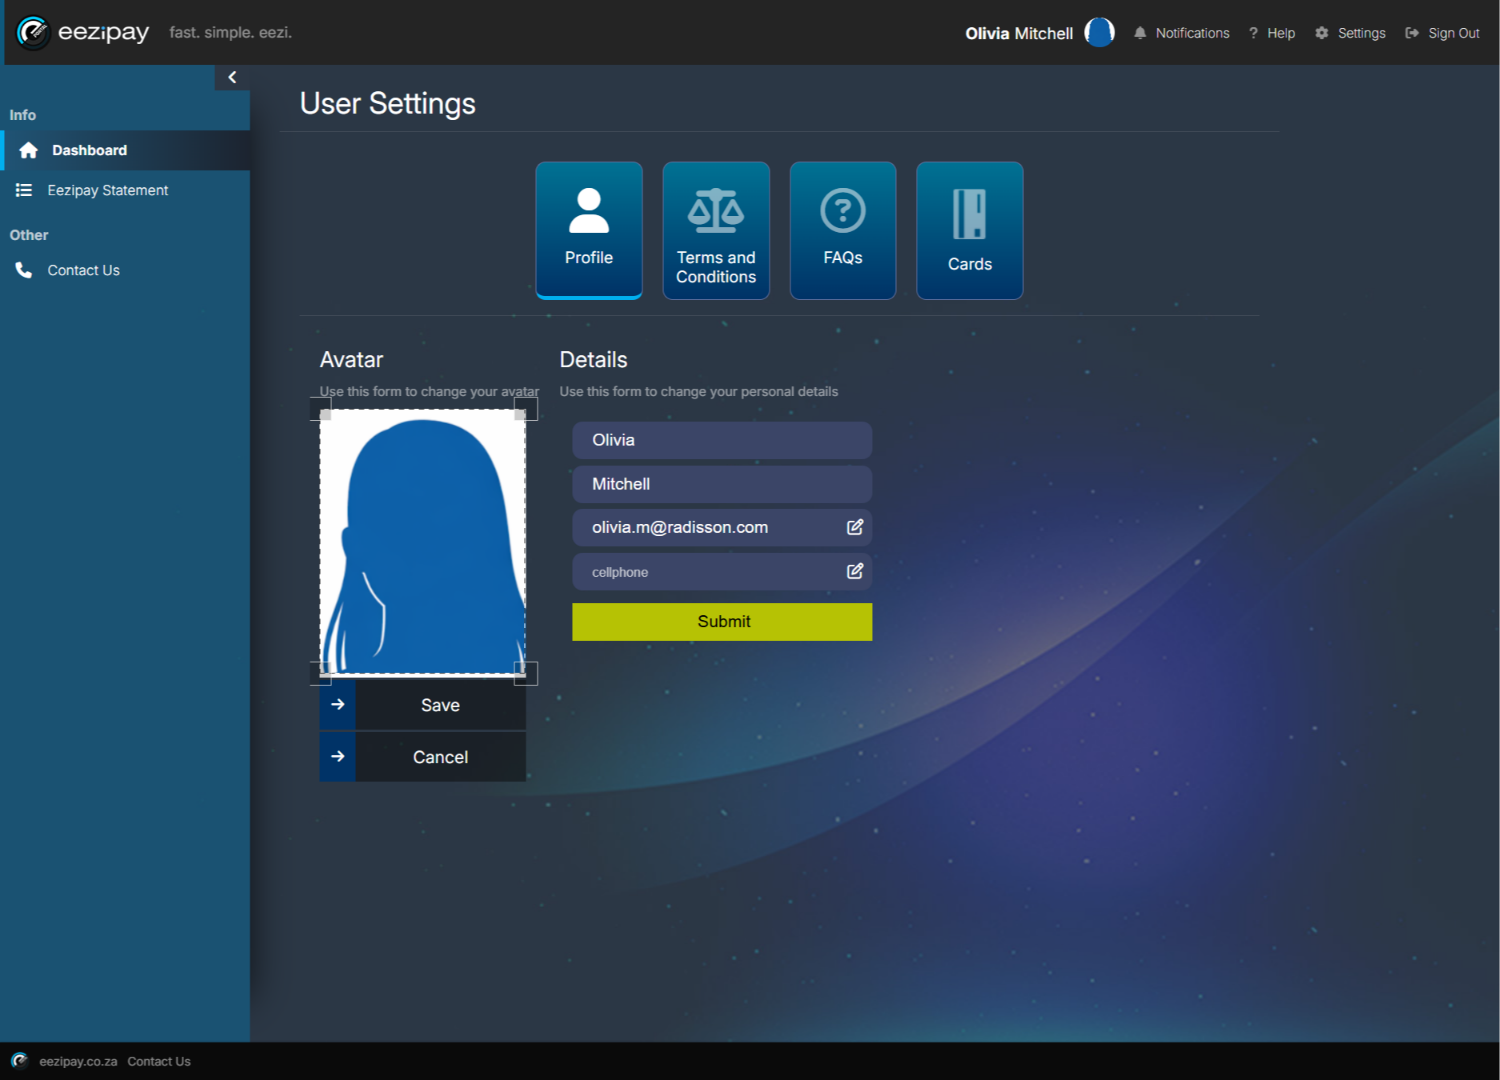
7. Profile
In your profile you can manage your name, contact details, and profile image. To add a profile image, simply click on the placeholder image, upload your own image, and click save.

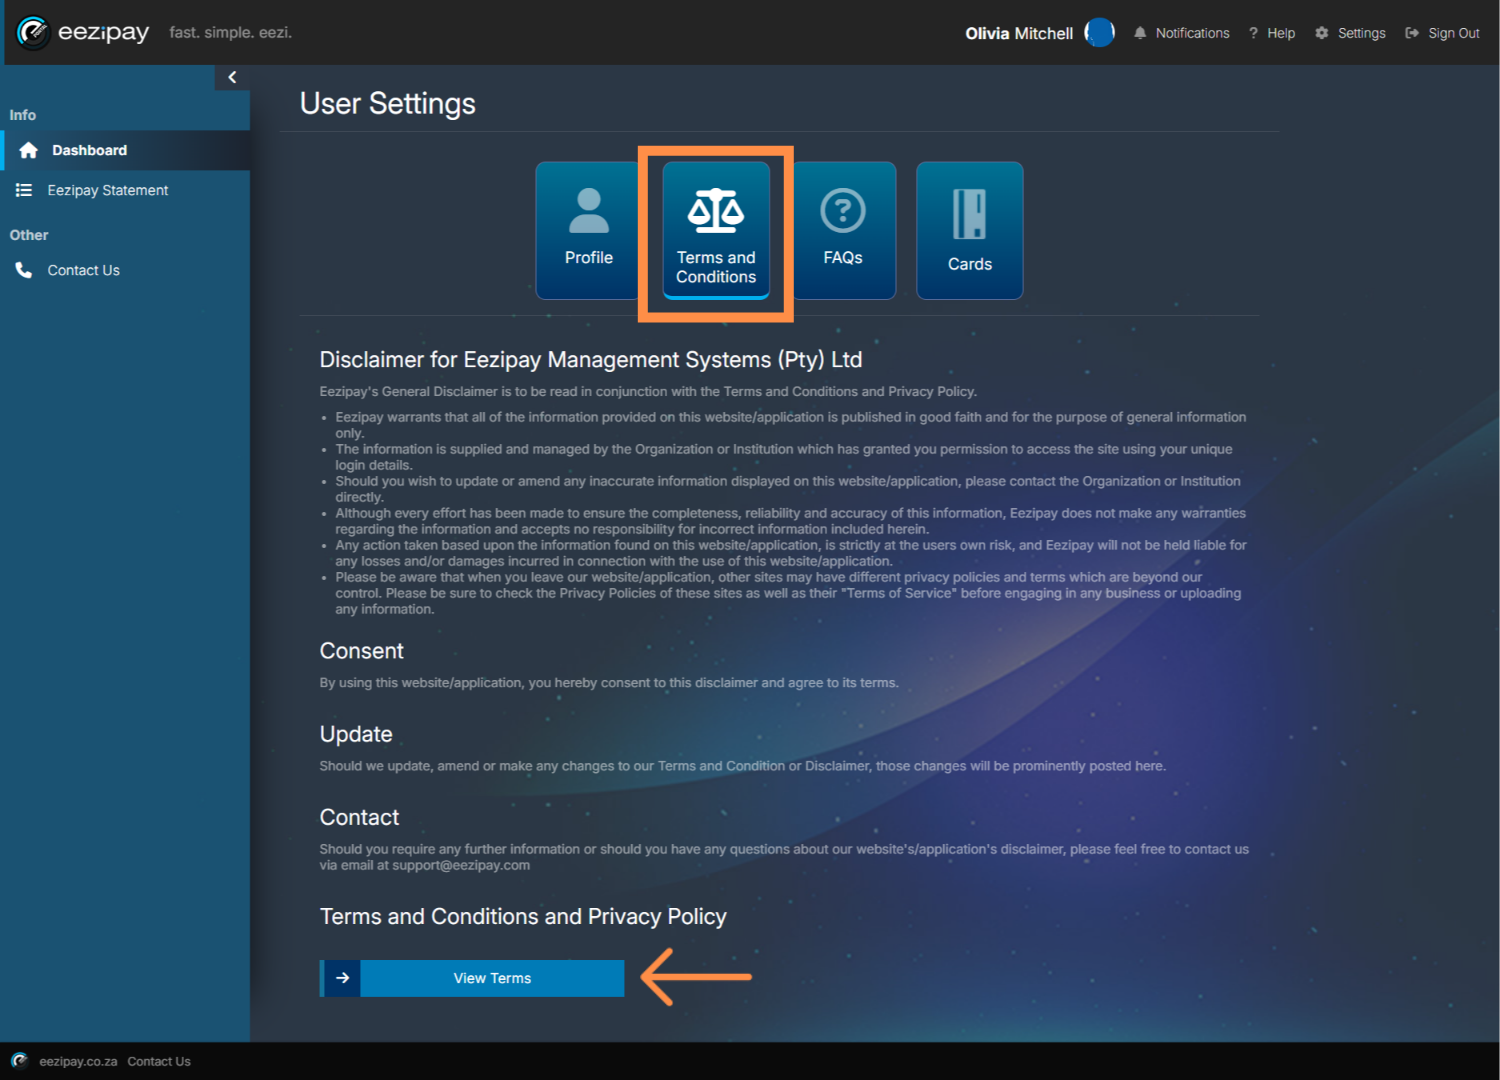
8. Terms & Conditions
Select the Terms and Conditions option to view our Tees & Sees, then click on the View Terms button below.
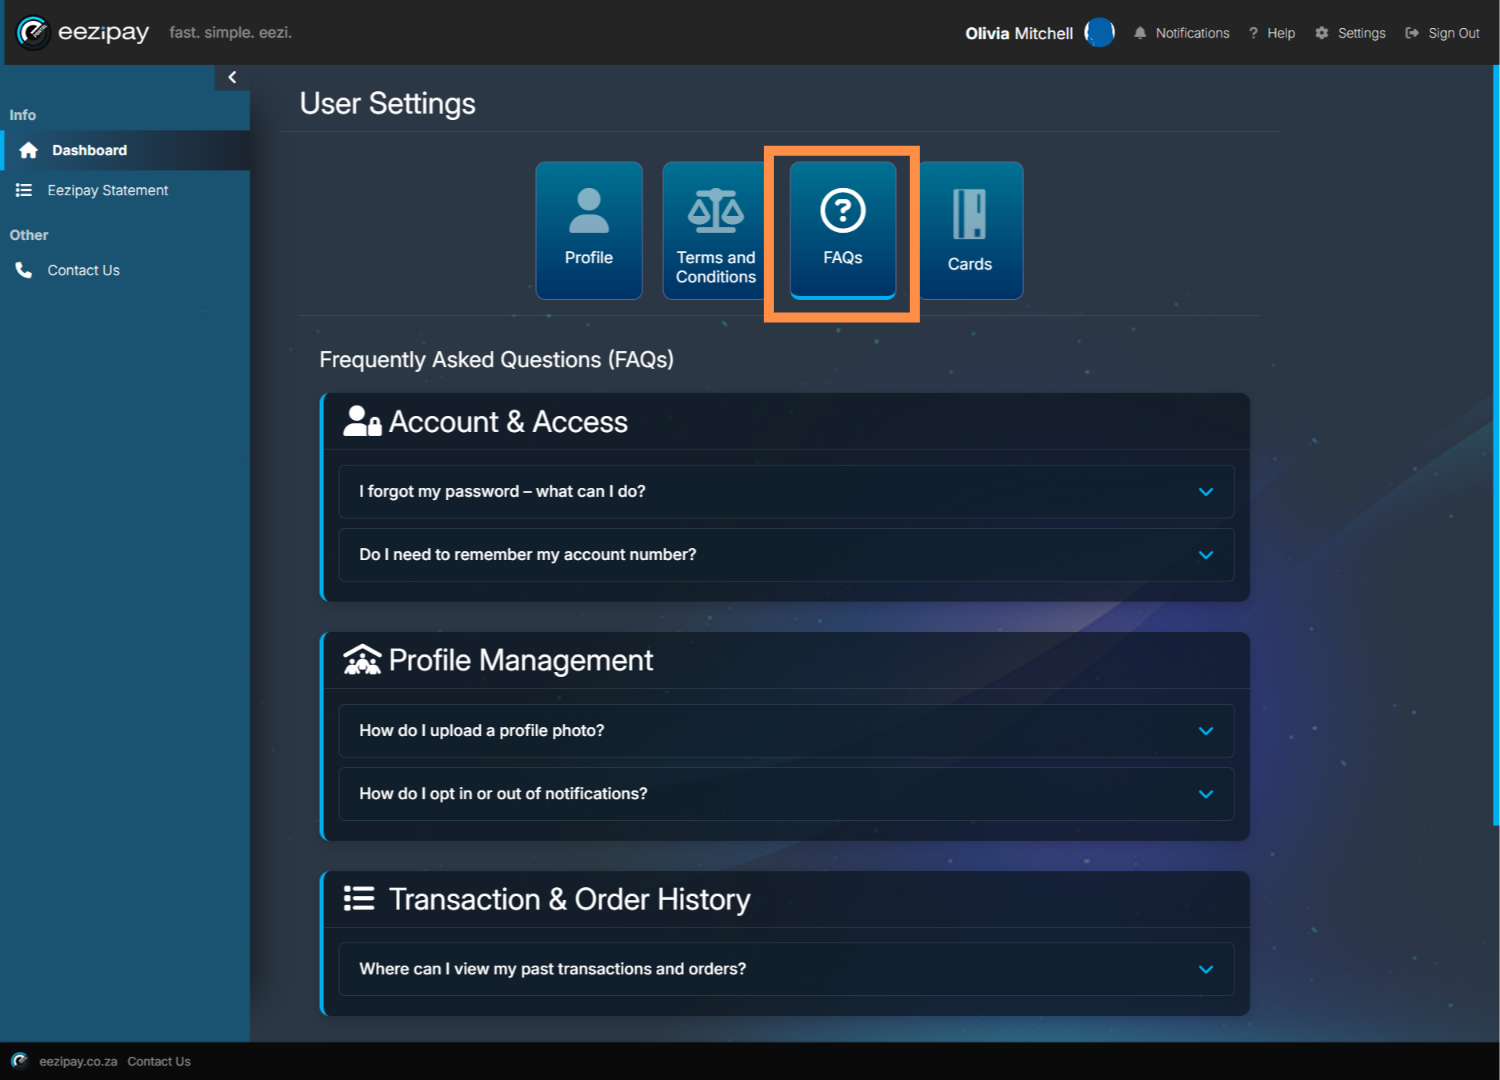
9. FAQs
View Frequently Asked Questions and Answers by clicking on the FAQs button.

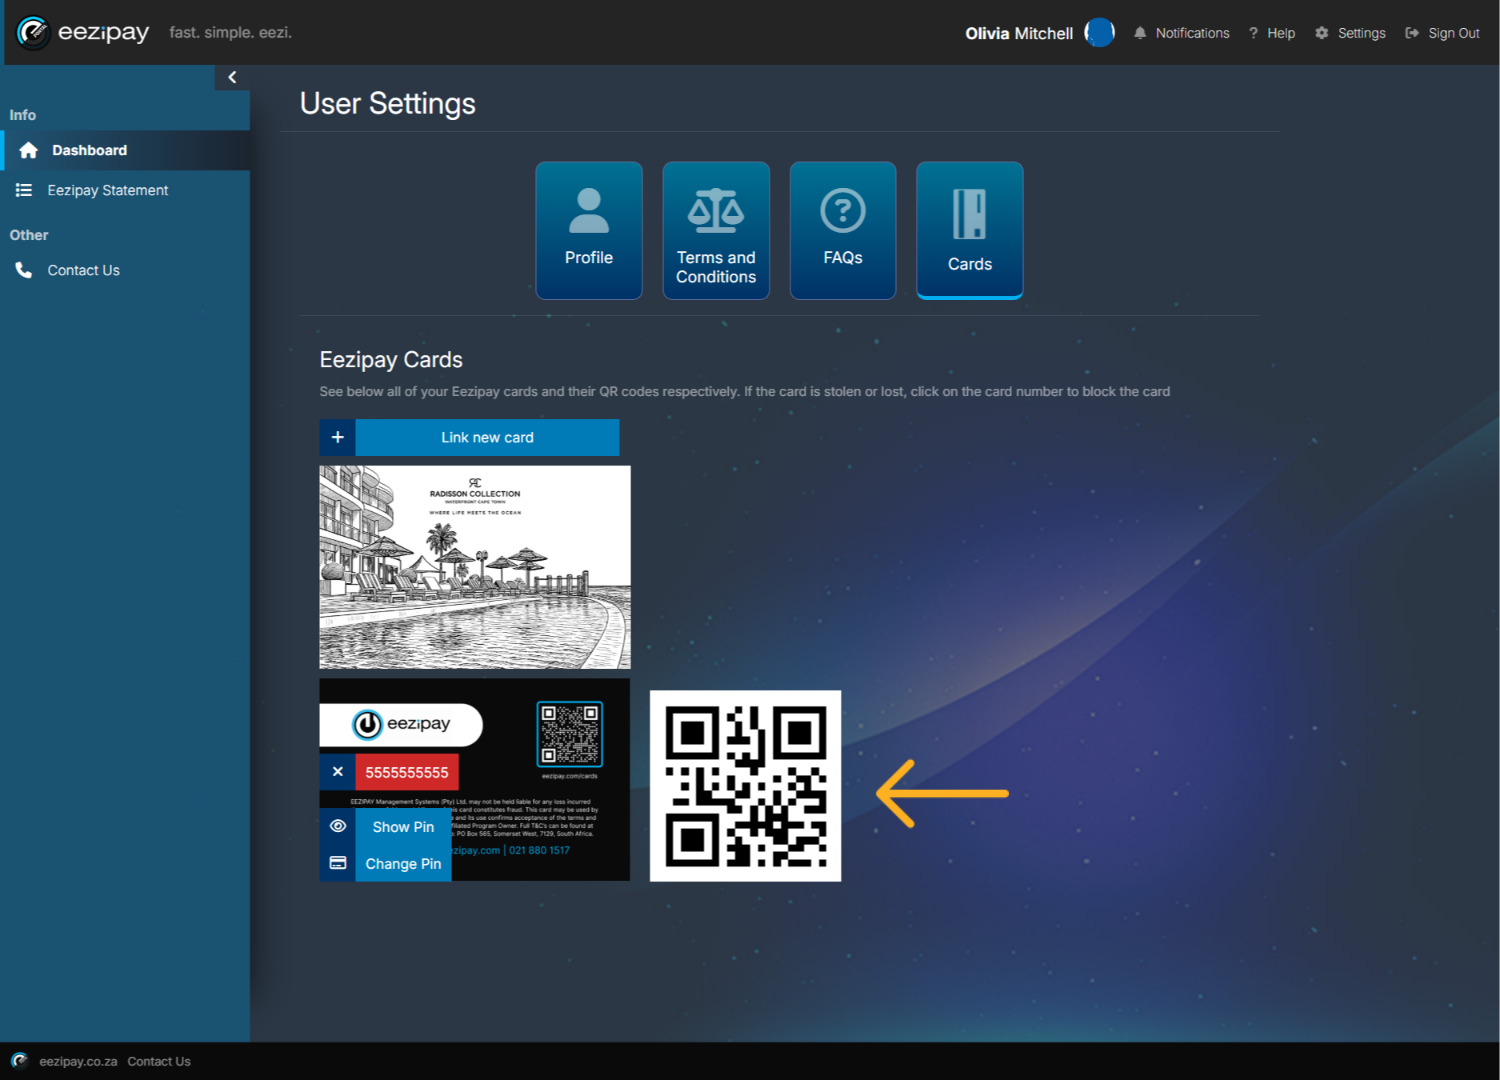
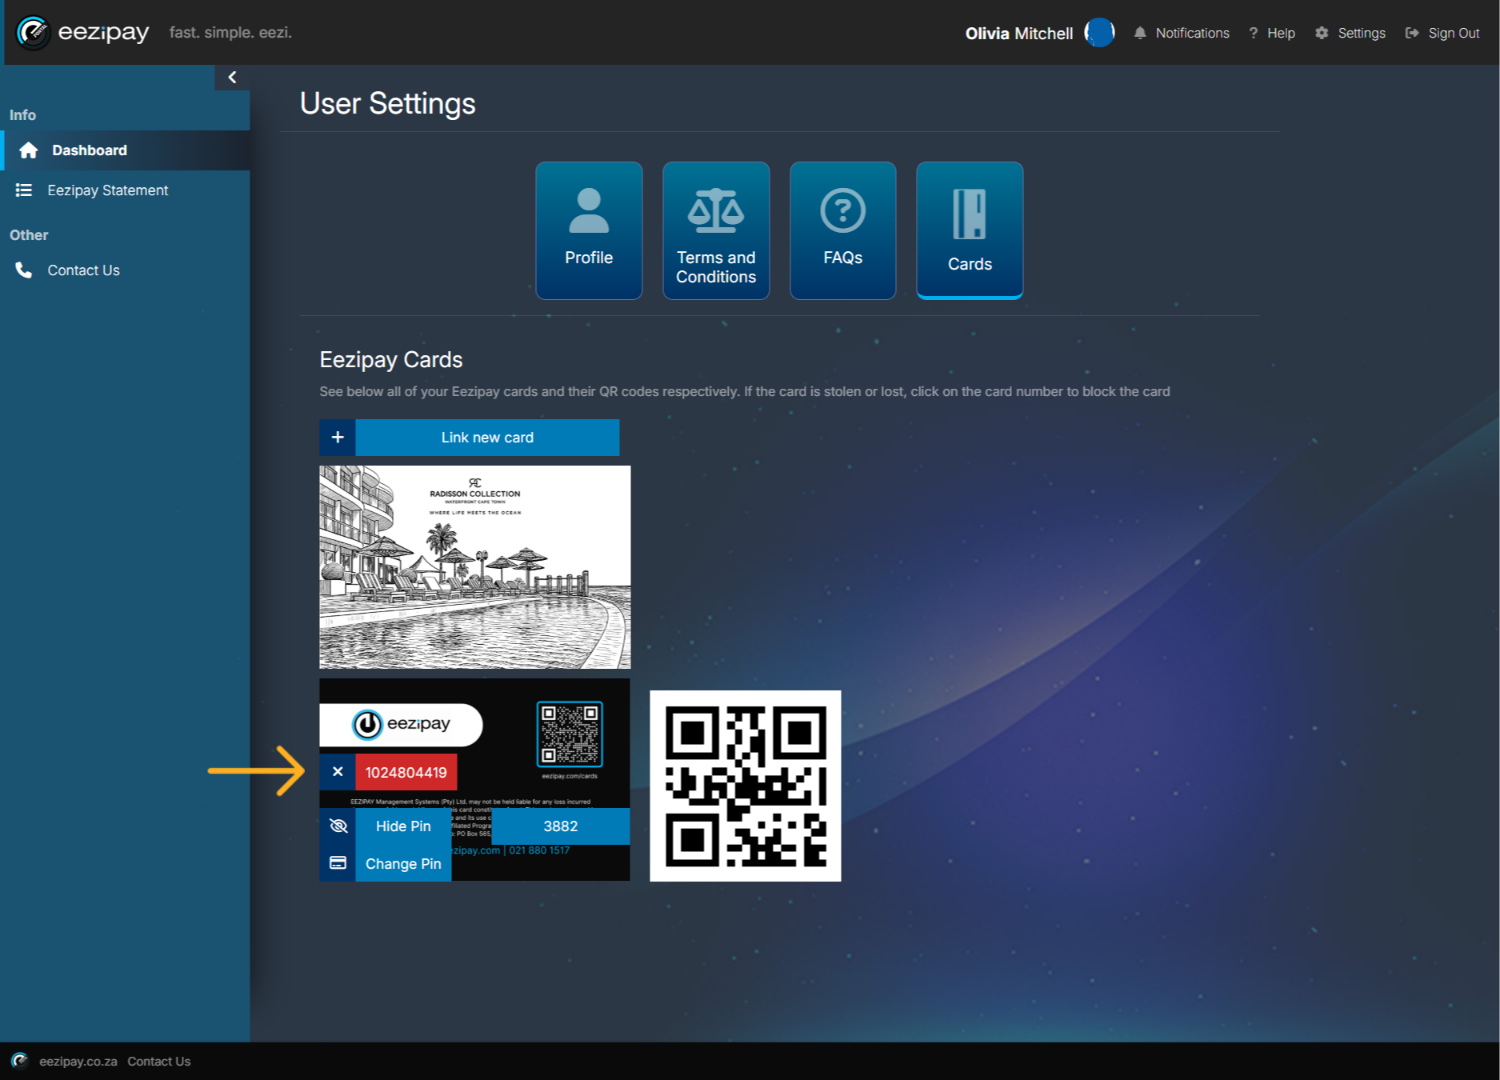
10. Managing Your Card
To manage your cards, click on the Cards button.

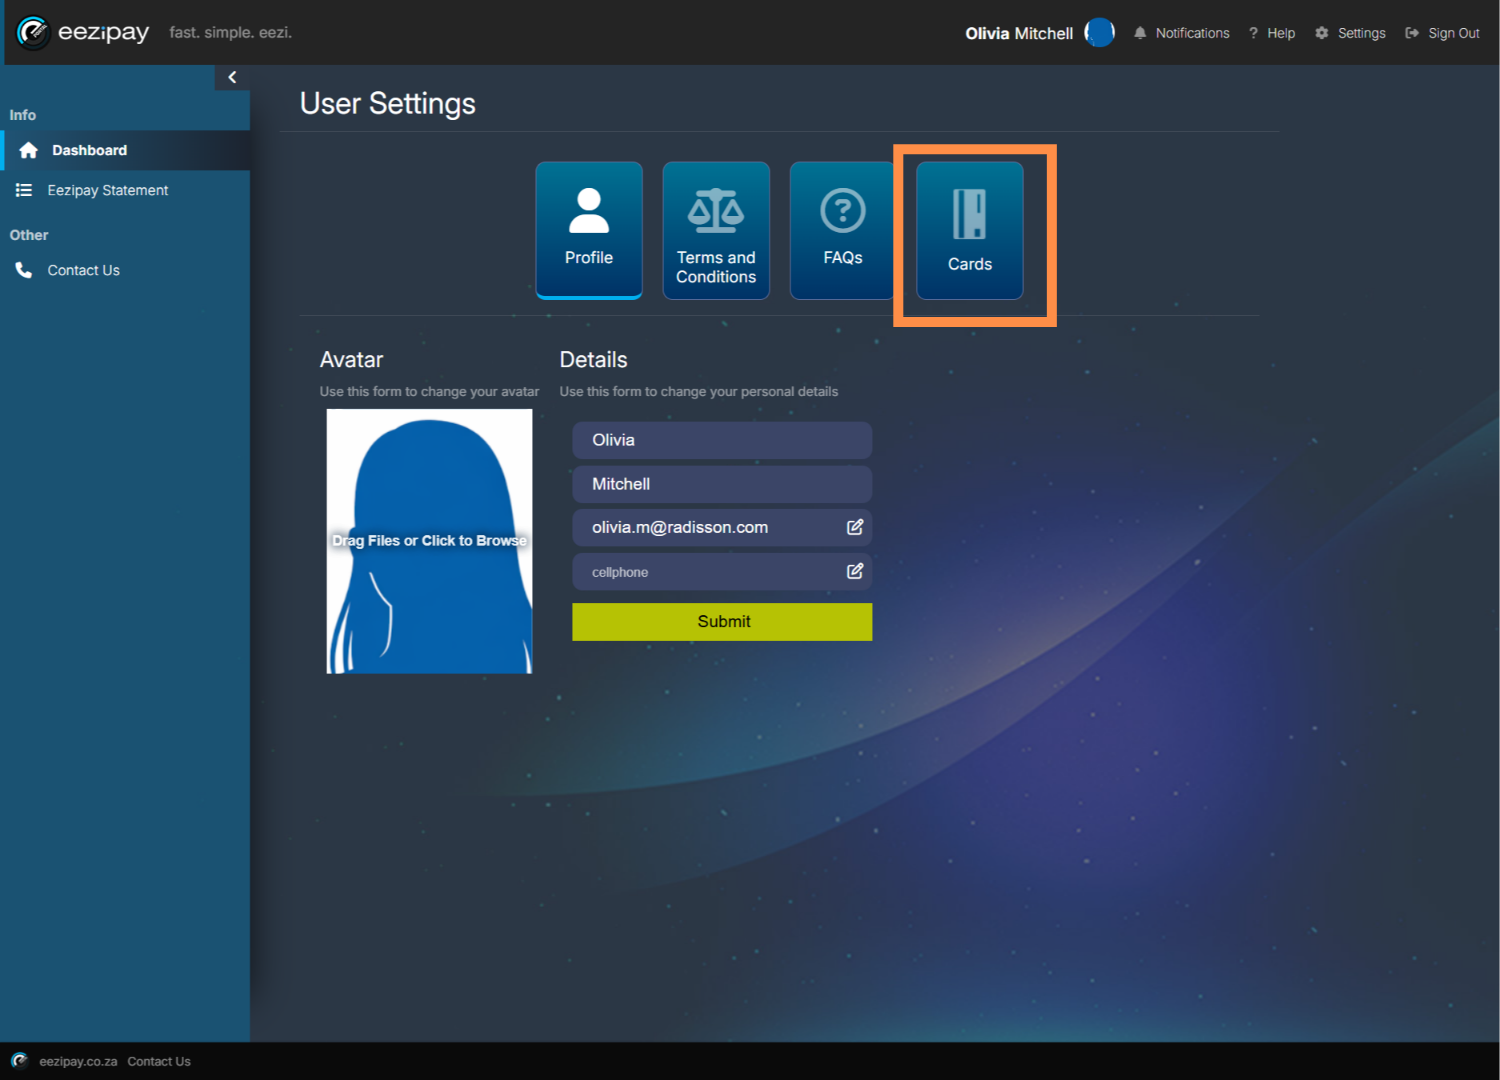
11. Card Management Options
You will be directed to the Eezipay Cards section. Here you can retrieve and change your pin, access your card QR code, link a new card, and block or cancel your card.

12. Paying with Virtual Card
If you do not have your physical card with you at the till, you can still pay with your virtual card. To do so, log into the portal using your phone, then navigate to your cards, and hold up your QR code for the cashier to scan. Additional ways to pay with your virtial card include, taking a screenshot of your QR code and saving it to your phone or printing it for easy access at the till. You can also save your card number and simply prezent that at the till as well.

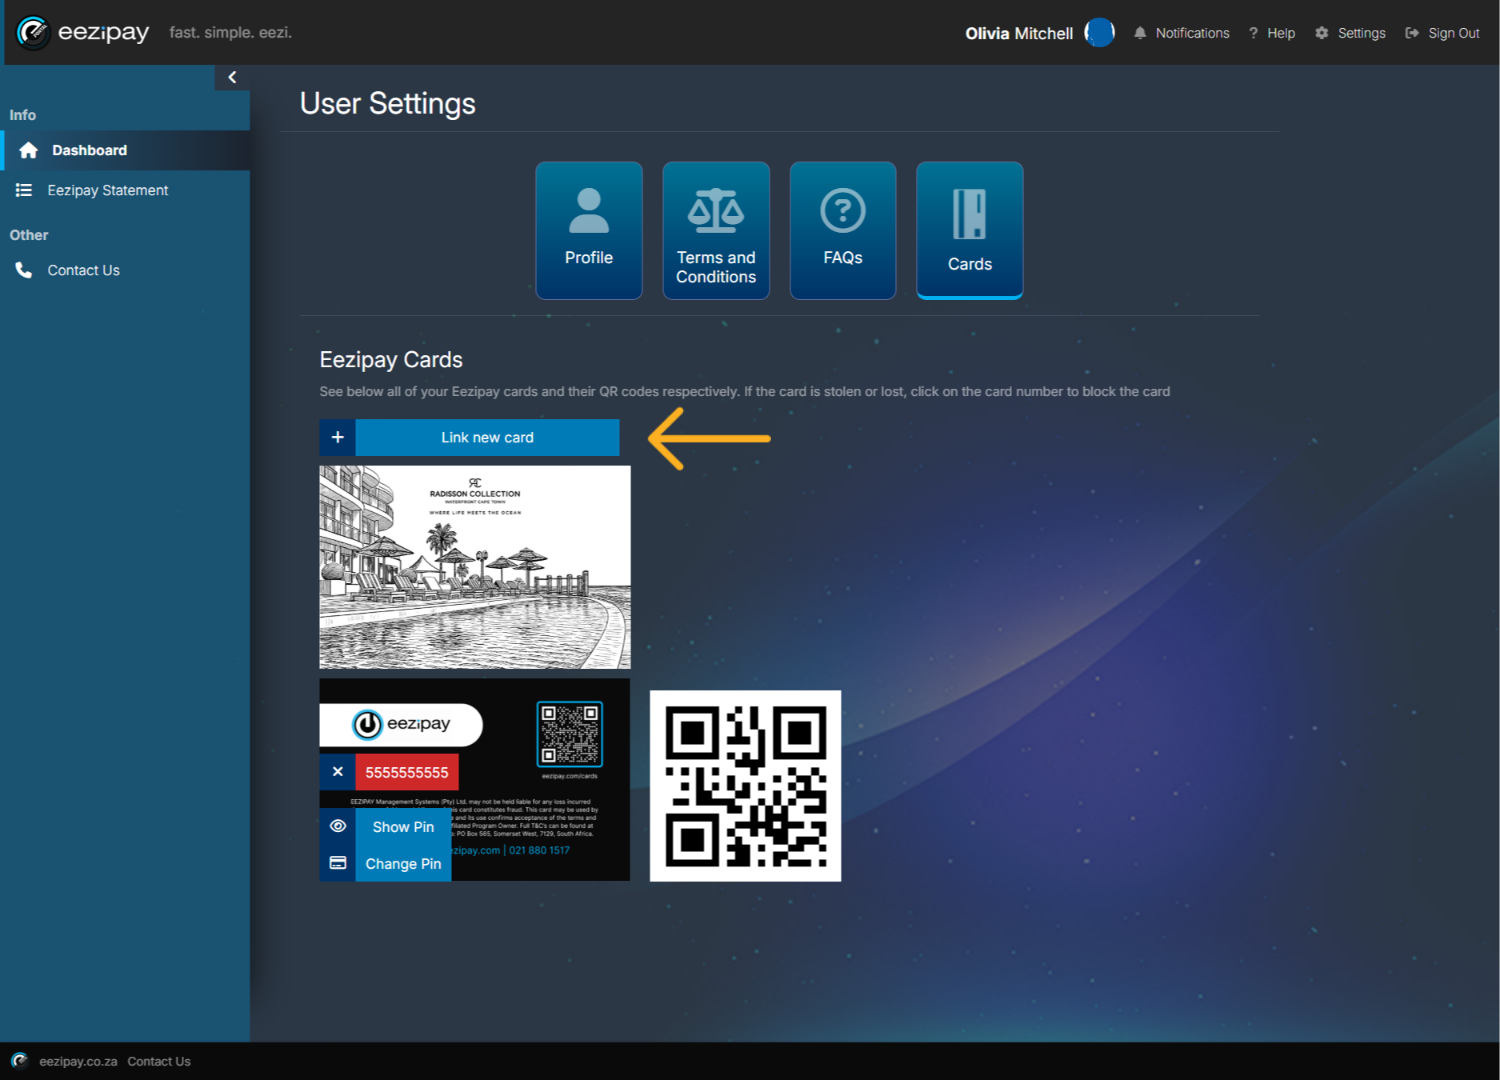
13. How to Link a New Card
When you receive a new card from your HR administrator, the card will most likely already be linked. However, if you need to link a new card yourself, please follow these steps. Firstly, click on the Link New Card Button.

14. Accessing Card Link Fields
The Card Number and Pin fields will become available.

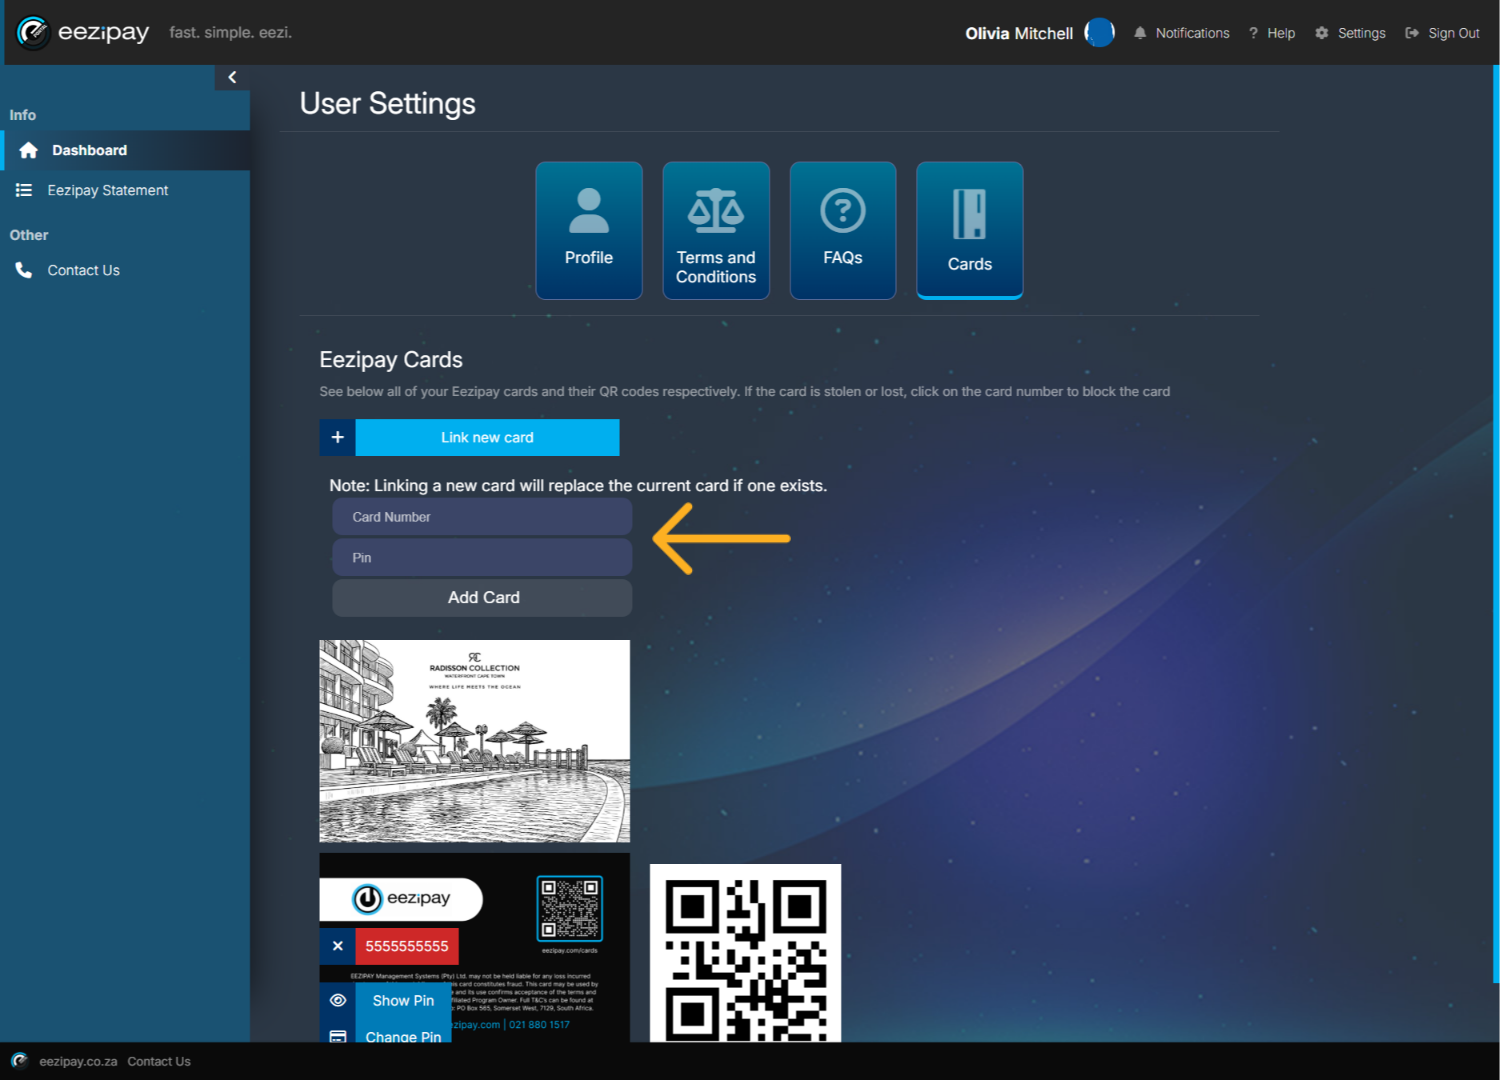
15. Adding New Card Number & Pin
Add the new card number that you’ve received from your HR administrator, set a pin for your card, and click Add Card.

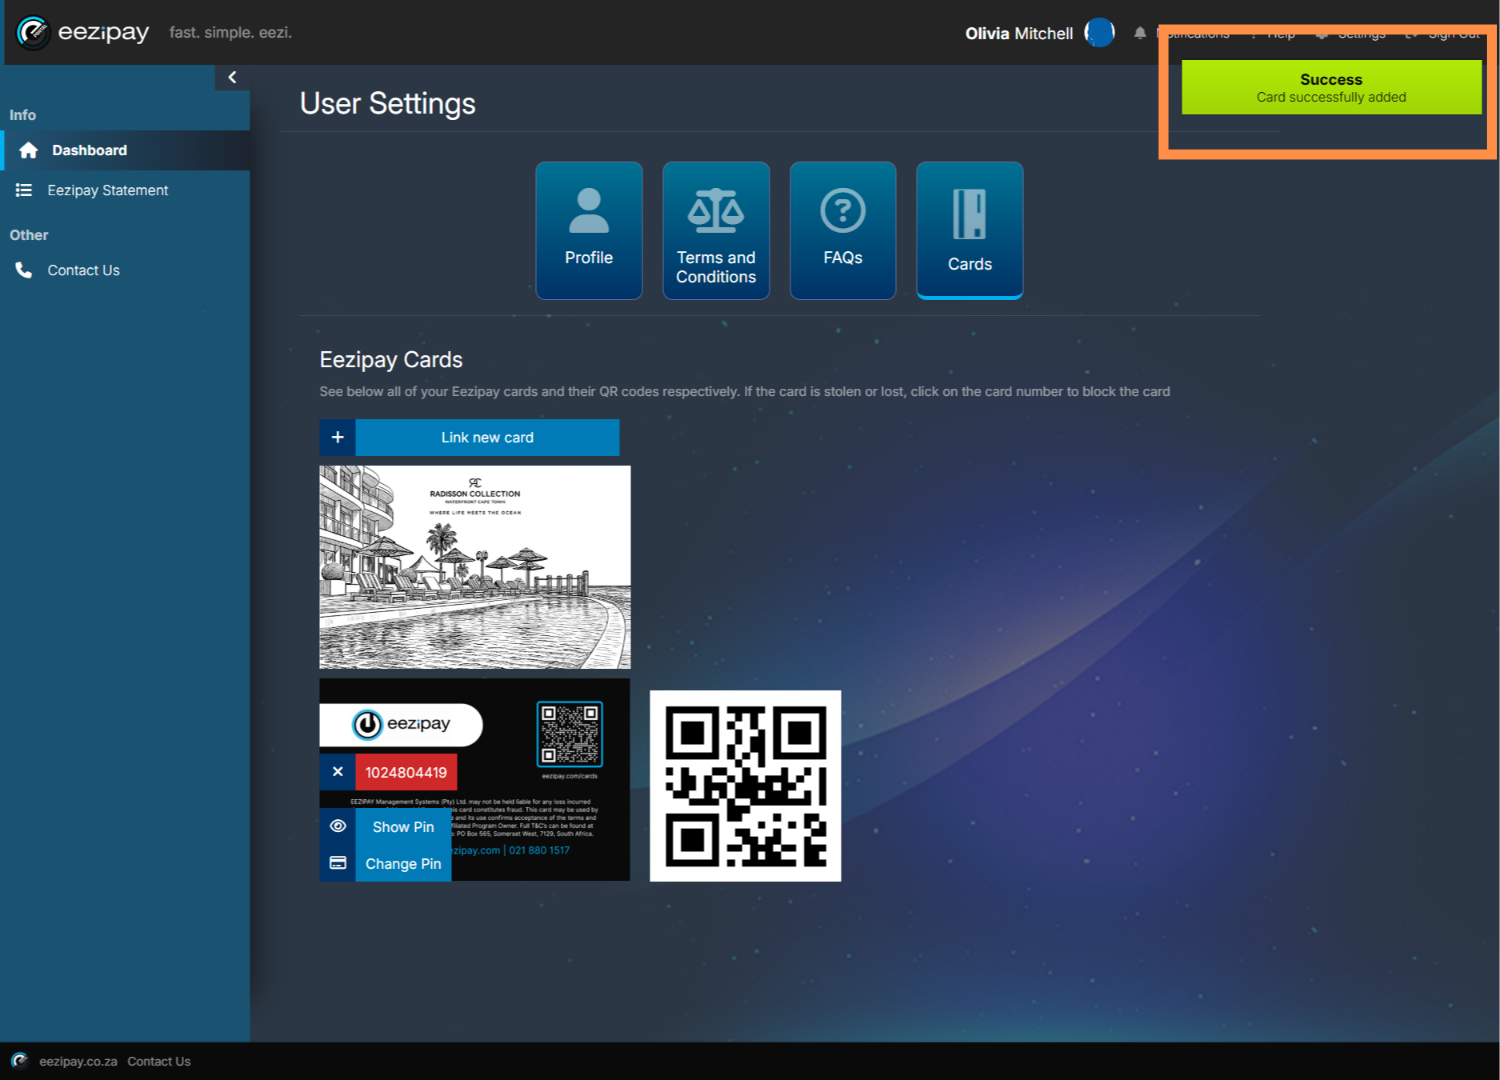
16. Card Link Success
The system will then indicate that the card was successfully linked.

17. View Pin
To view your pin, click on the Show Pin option available on the card.
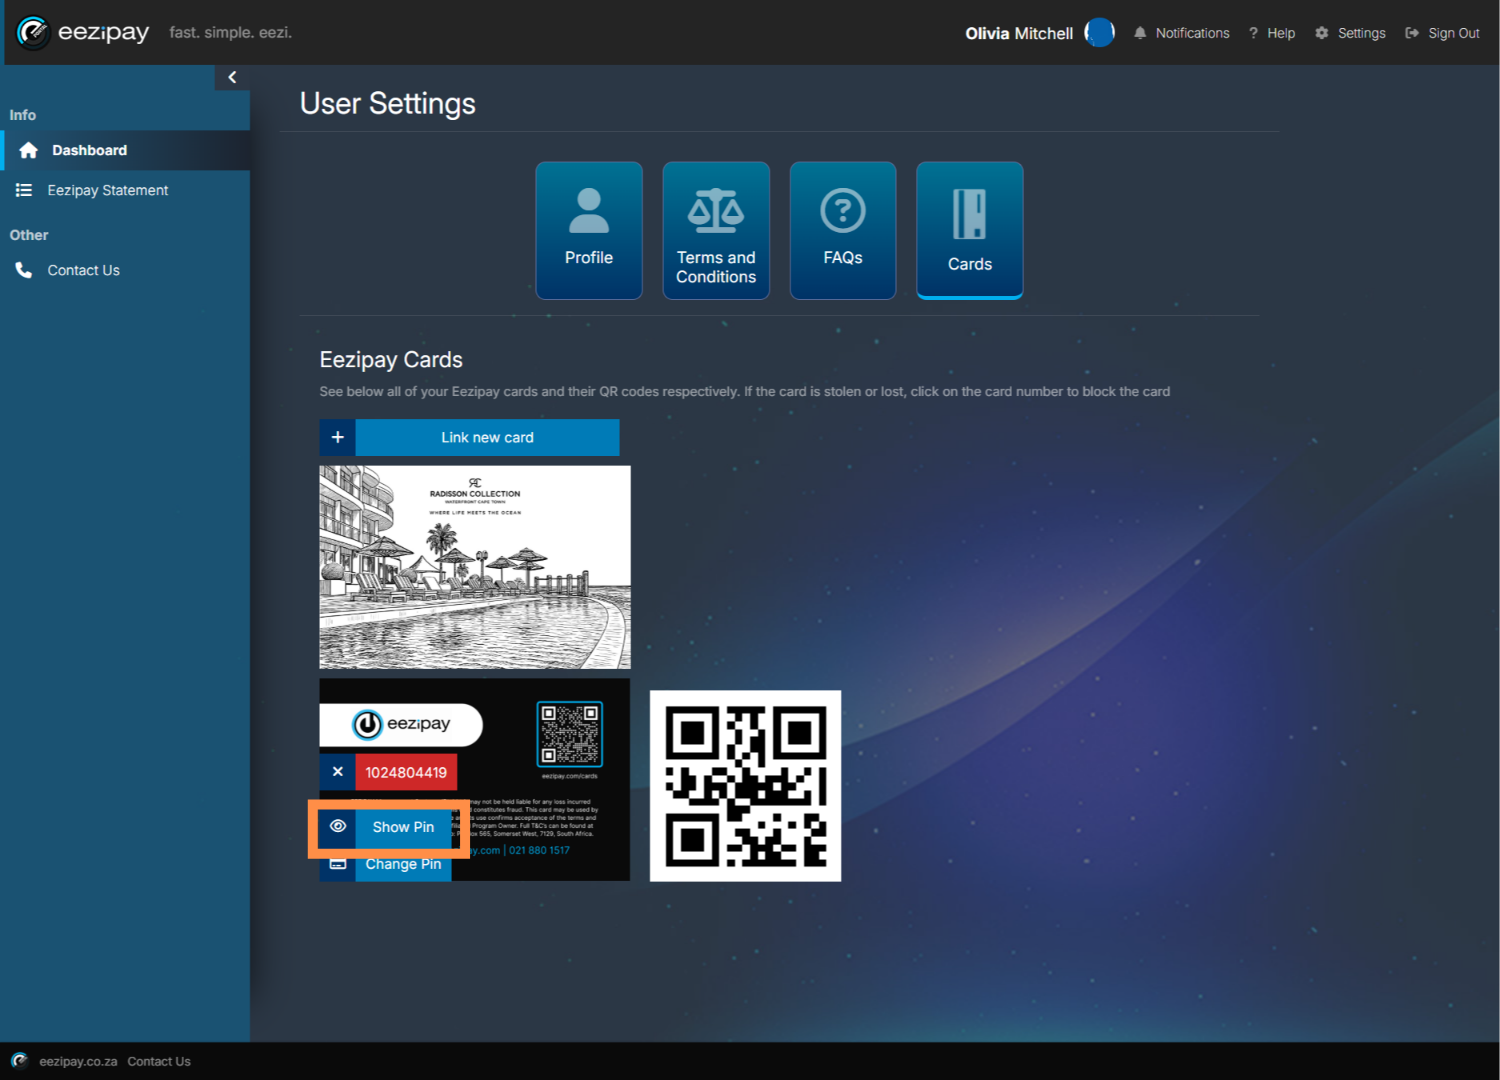
18. Pin Shown
The application will then display your pin on the card as illustrated.

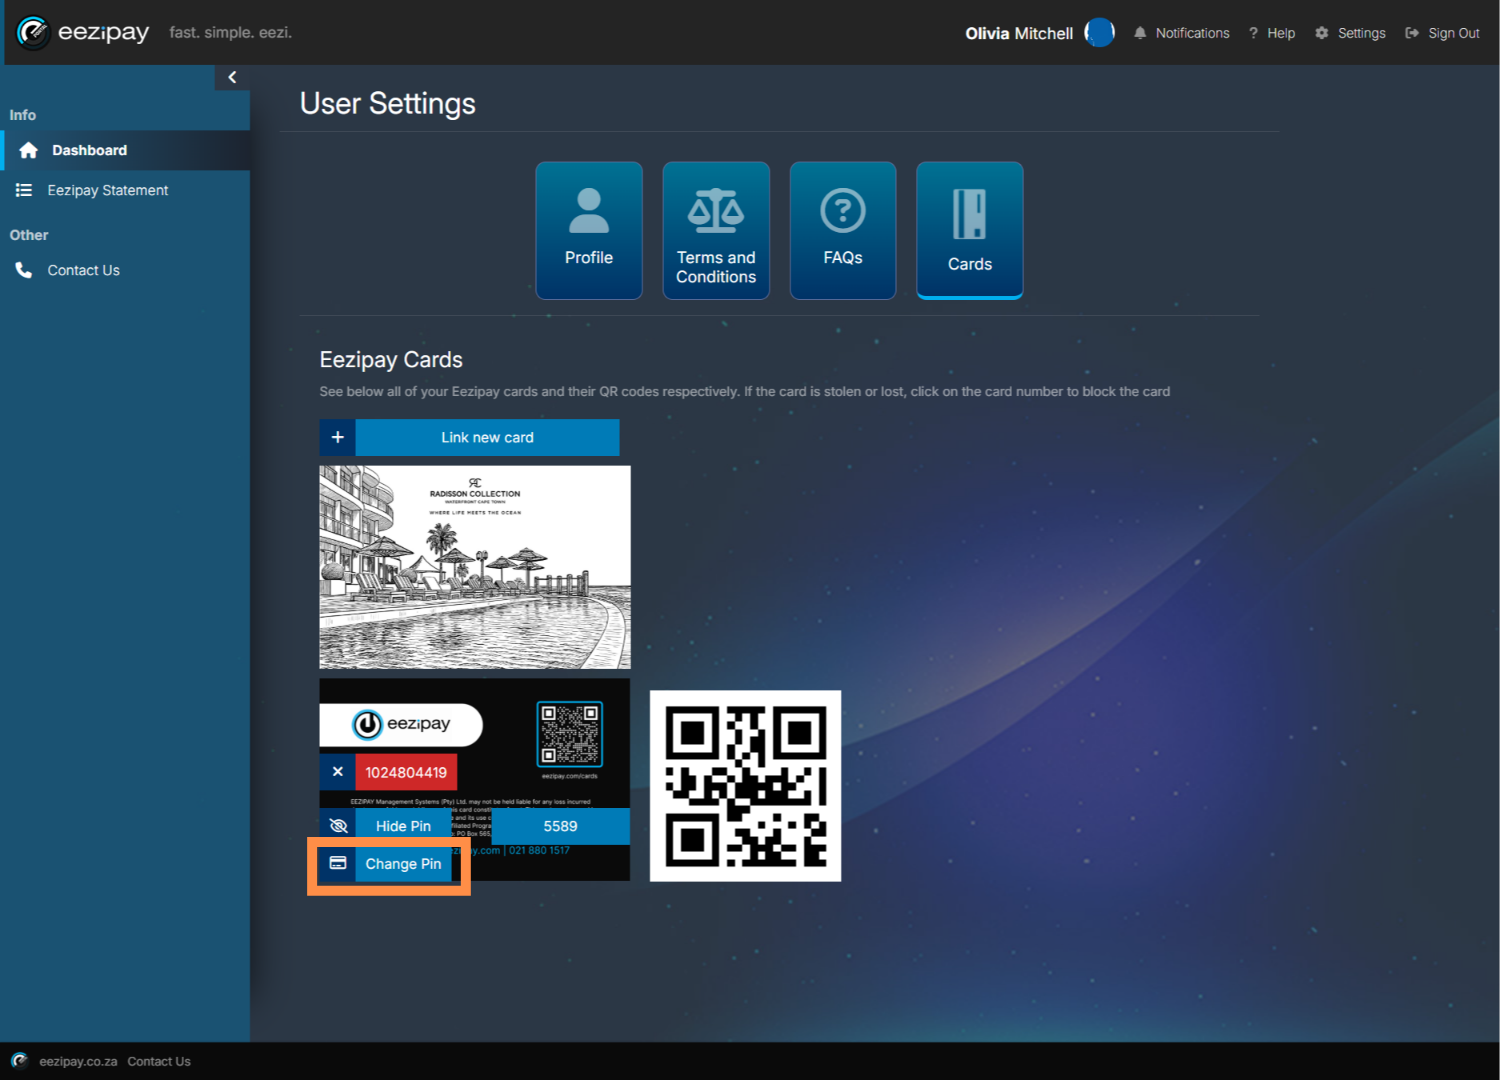
19. How To Change Your Pin
To change your Pin, click on the Change Pin button available on the card.

20. Change Pin
You will then be prompted to enter a New pin. Simply enter your new four digit pin in the space provided and click on the Change Pin button to confirm.

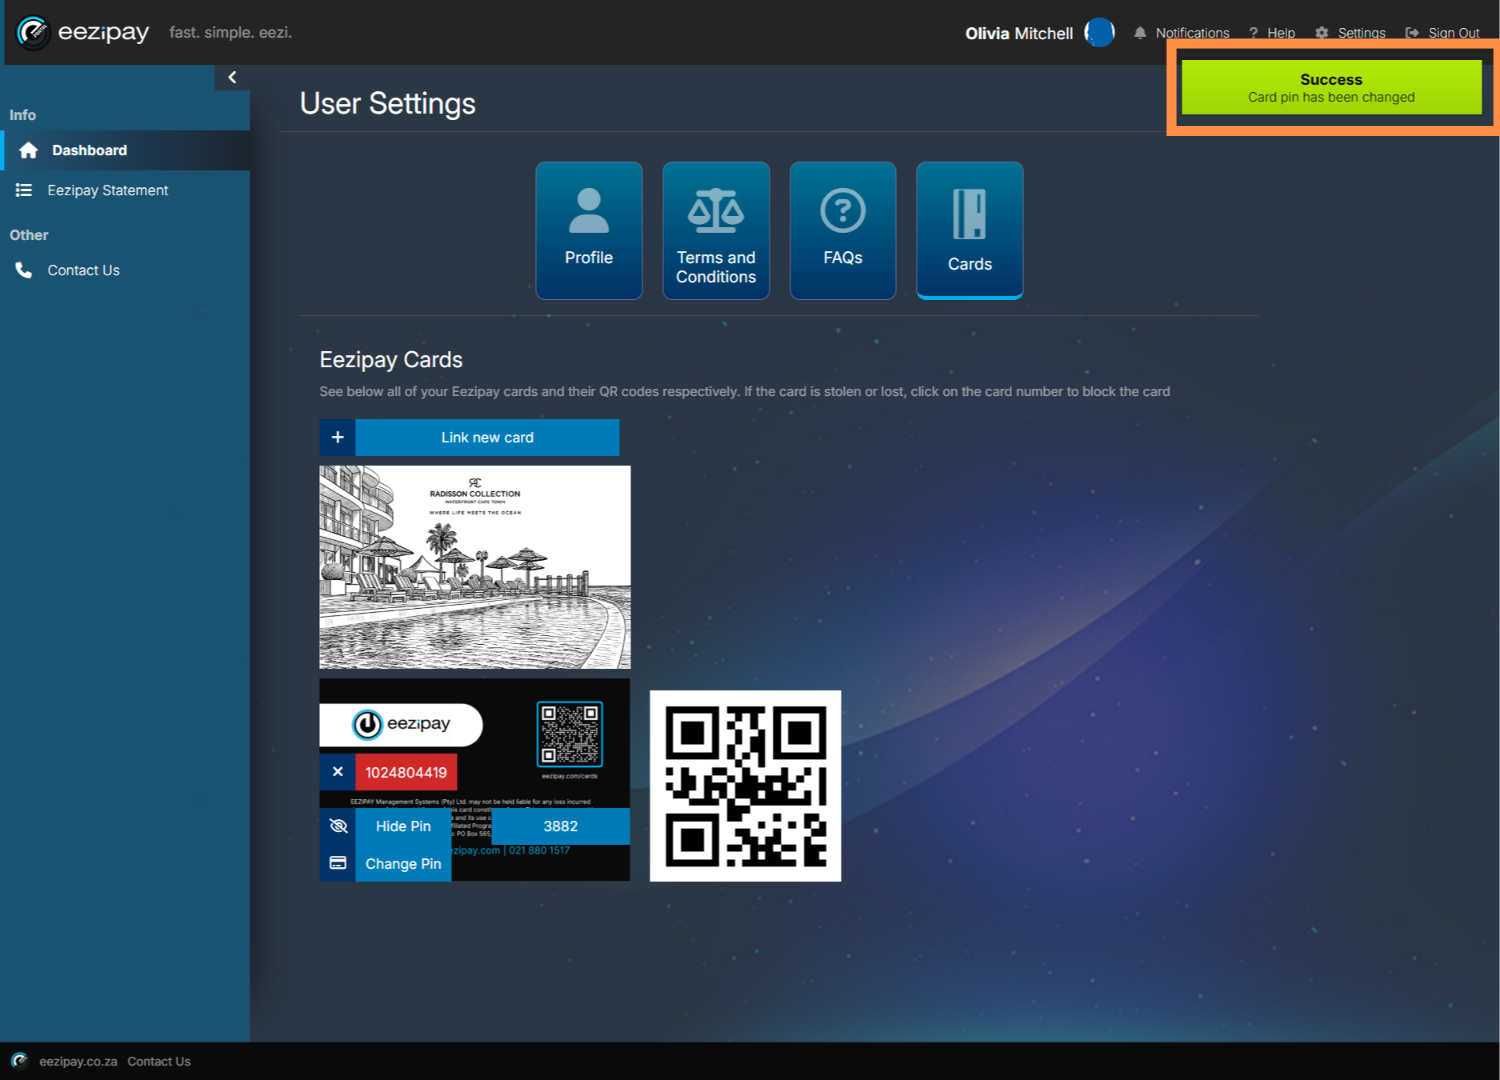
21. Pin Change Success
The system will then indicate that the pin change has been successful.

22. The system will then indicate that the pin change has been successful.
To block a lost or stolen card, click on the X located on the card you wish to remove and block.

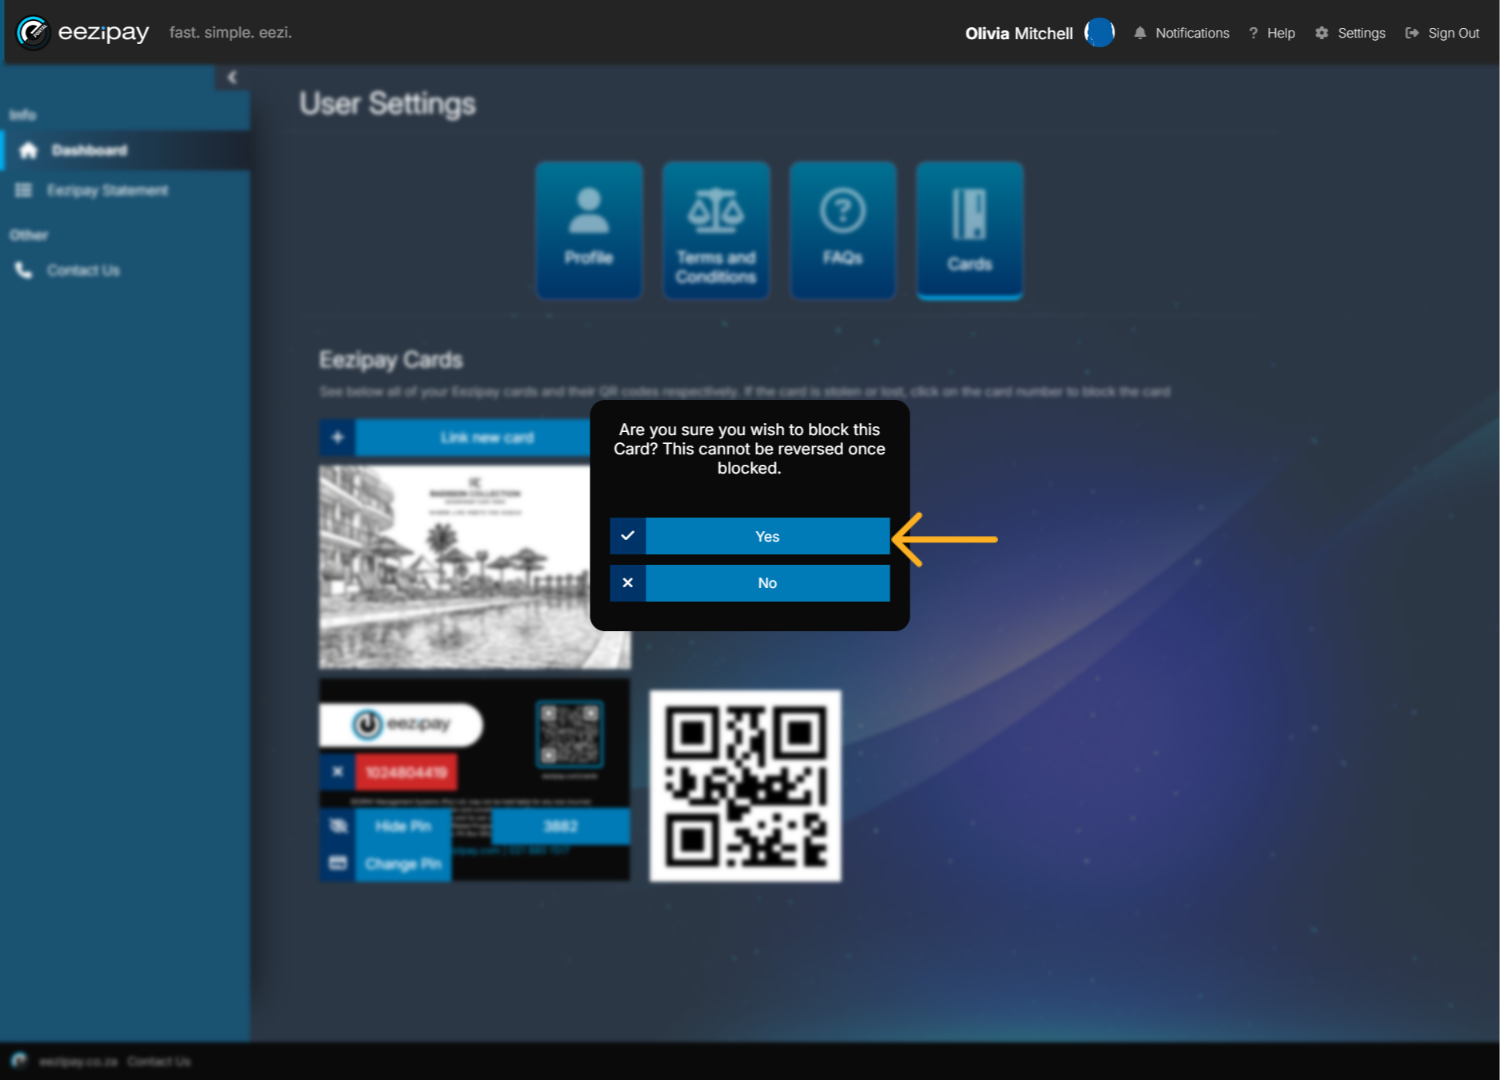
23. Card Block Confirmation
You will then be prompted to confirm whether you want to block the card. Click the Yes button to confirm.

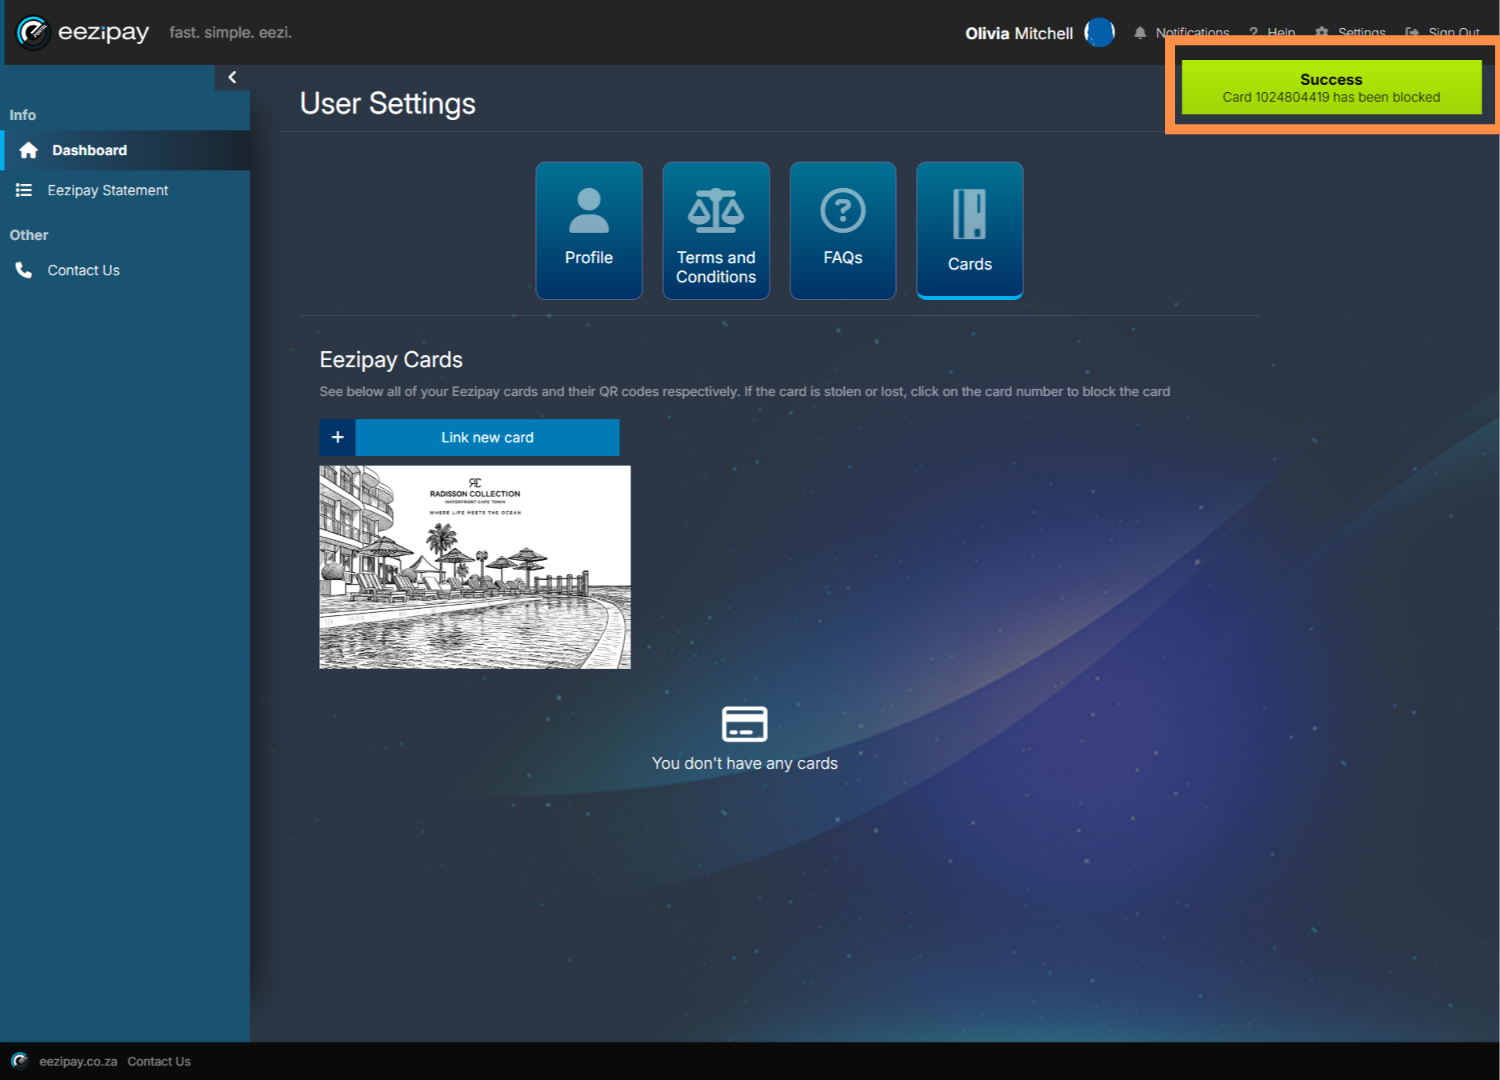
24. Card Block Success
The system will then indicate that the card was successfully blocked.

25. How to View Eezipay Statements
You can view your statements from the Main Menu. Simply click on the Eezipay Statements menu option to proceed. On the Eezipay Statement page, you will be able to see all of your account transactions that you’ve made for the month.

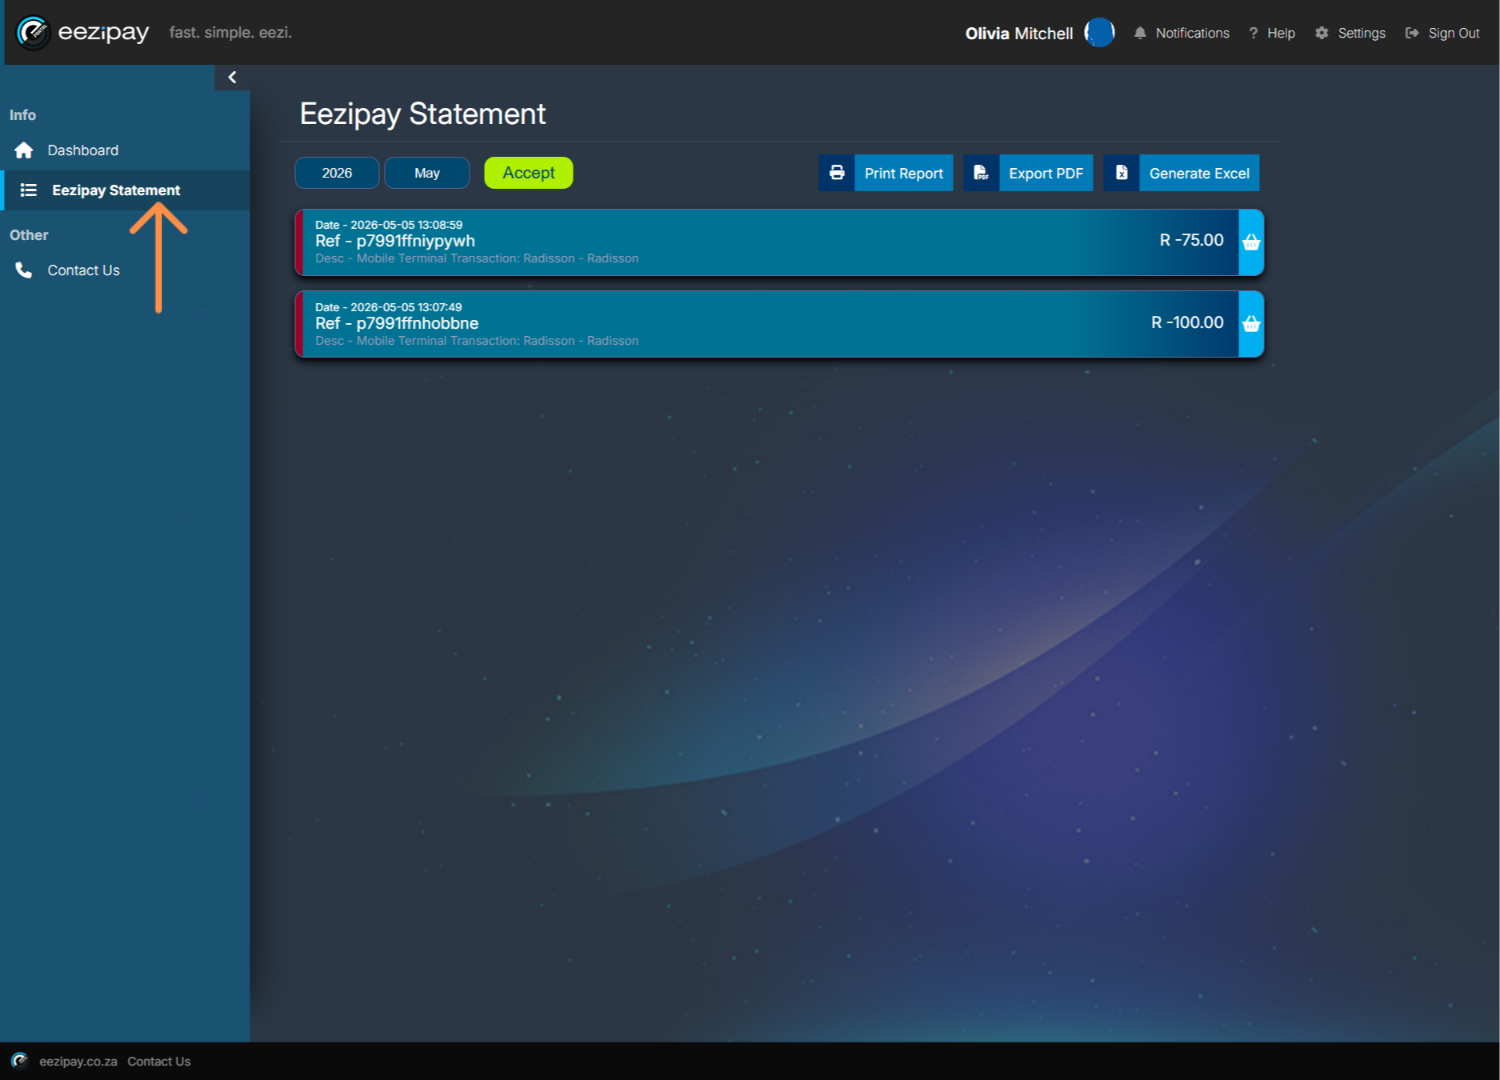
26. How to View Eezipay Statements for specific months
If you would like to see transaction for a different period, you can do so by changing the year and or month options in the filter provided and then clicking the Accept button.

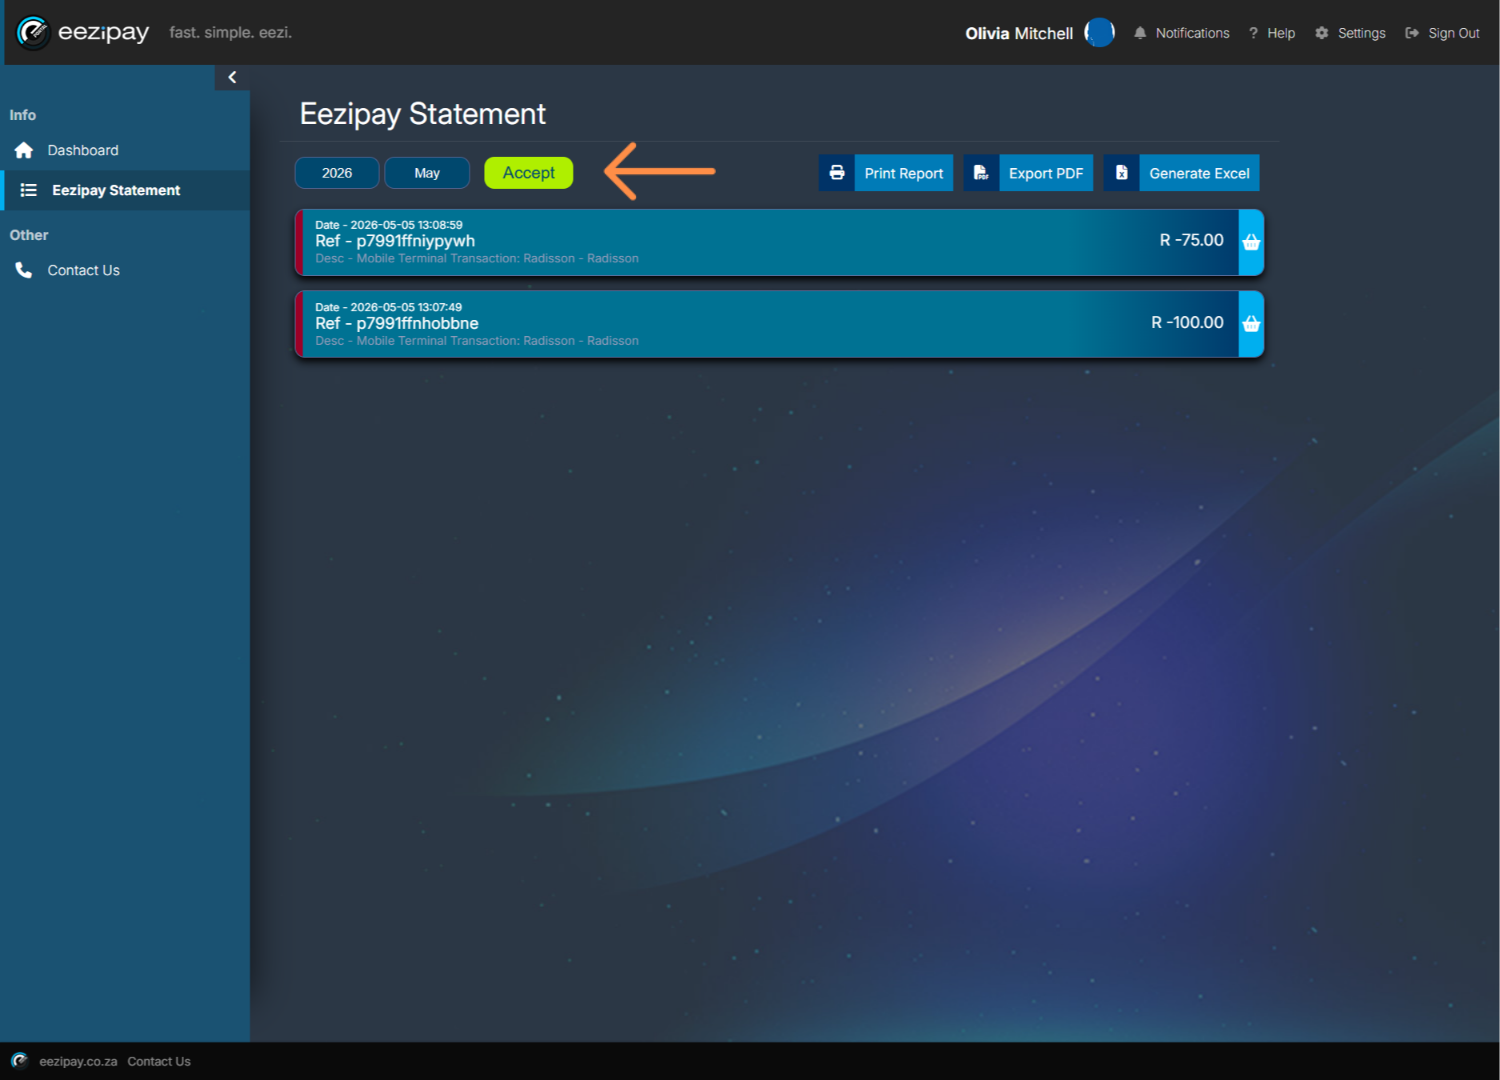
27. Exporting Statements
Once generated you can print or export the statements in Excel or PDF.

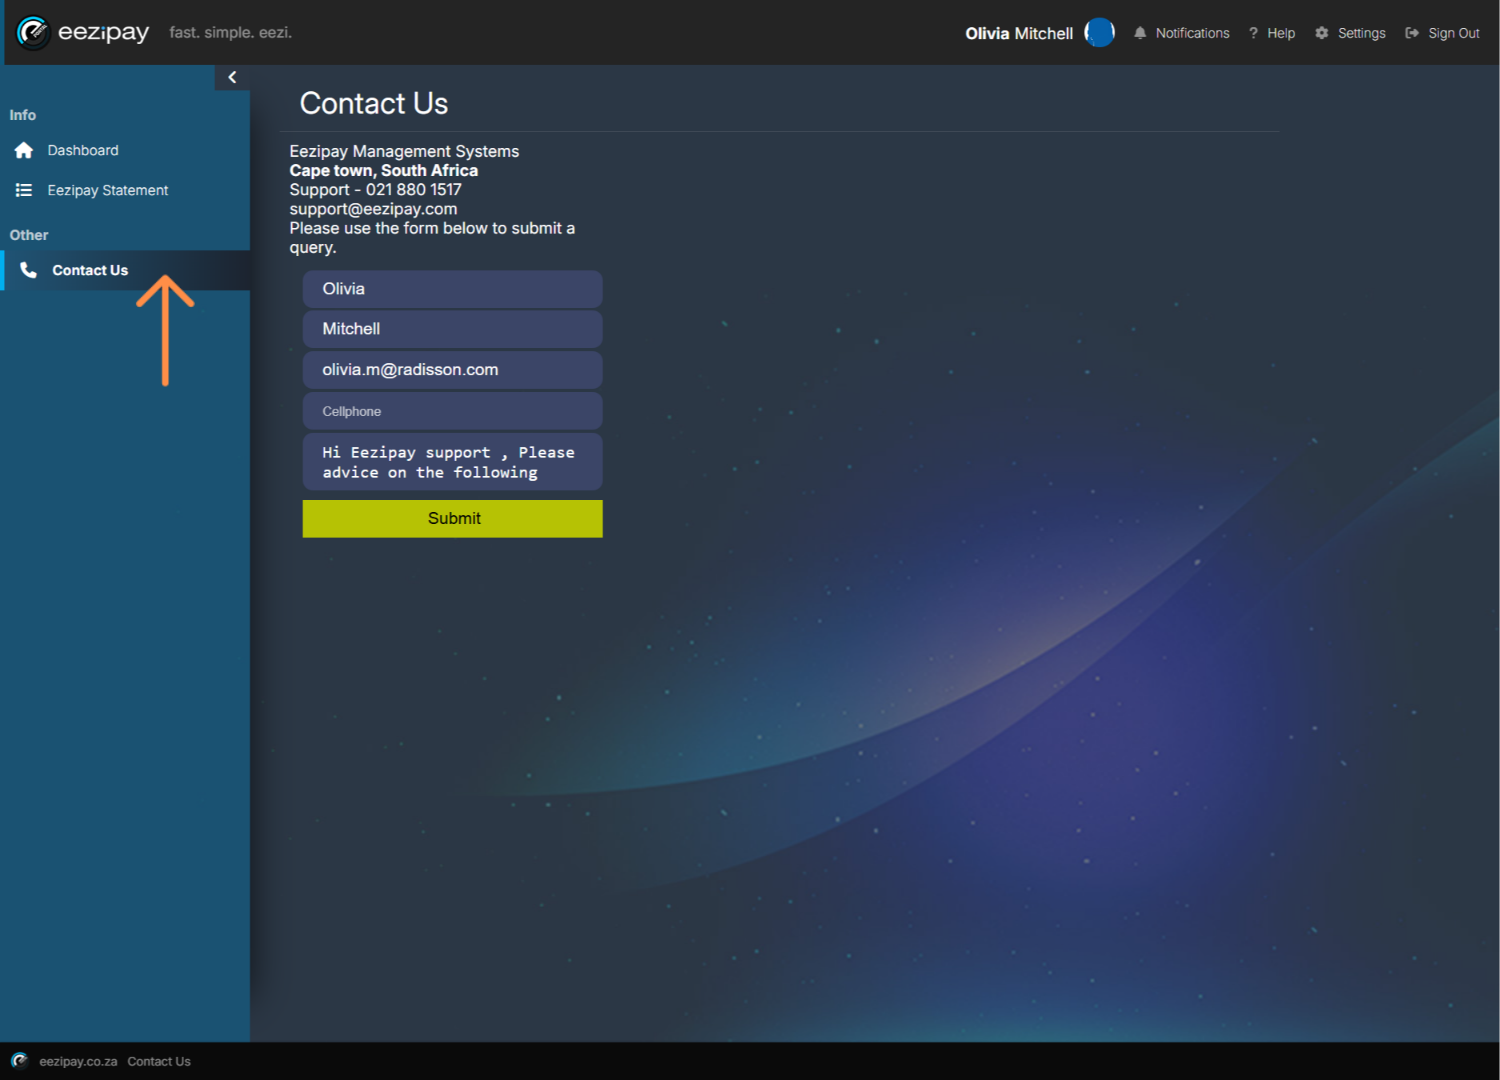
28. How to Contact Eezipay Support
If you have any application-related questions or concerns, you can reach out by using the Contact Us functionality. Click on the Contact Us menu option to start this process. You will be directed to the Contact Us page.

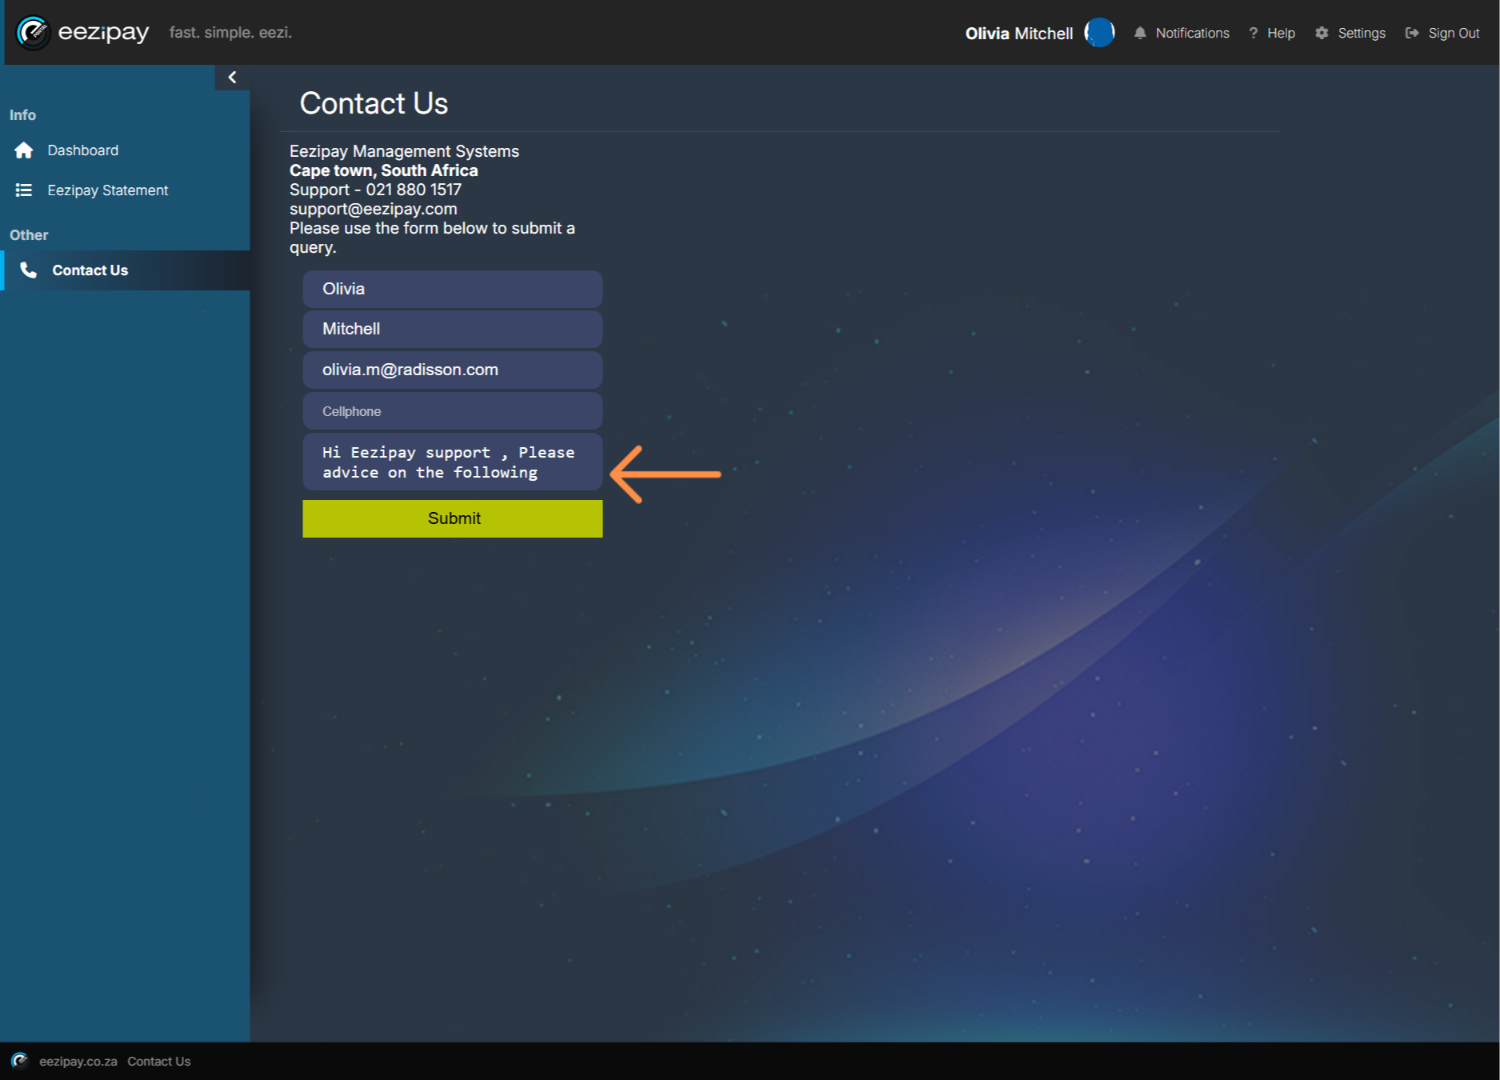
29. How to Contact Eezipay Support
Here, simply enter your concerns or questions in the available field, and click on the Submit button to proceed with the submission of the query.

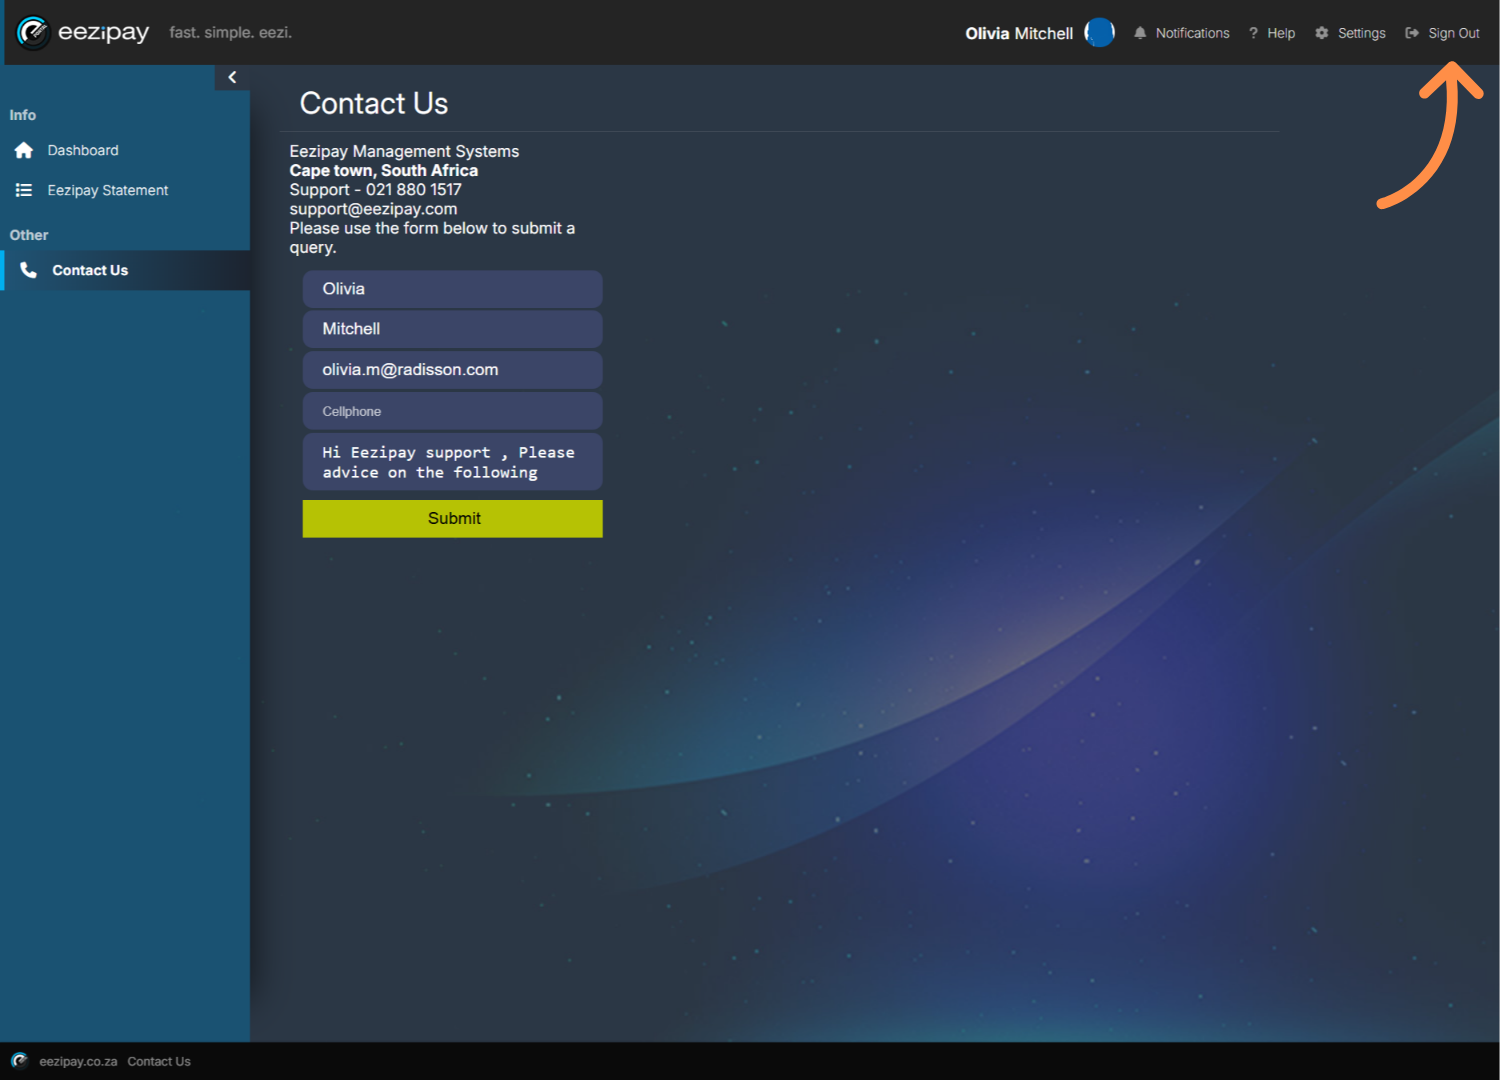
30. How to Log Out of the Eezipay Application
To sign out of the application, simply click on the button located at the top right-hand corner of the screen.

Thank you for taking the time to view this Radisson User Guide. If you have any questions or need further assistance, our support team is here to help. Simply reach out via email at support@eezipay.com. At Eezipay, we’re committed to making your experience simple, fast, and easy.
Radisson – MPT5 – Cashier Guide
Welcome to the Radisson MPT5 User Guide for Cashiers. Inside, you’ll find easy step-by-step instructions on how to Log in, Process transactions, Reprint slips, and Verify users. If you need help at any point, please contact support@eezipay.com.
1. How to Log in to the Application
1. On the Welcome screen, Cashiers are required to click on the Login button to proceed with the login process.
2. Enter your user code and password in the fields provided
3. Click on the Sign in button to successfully log in to the application

2. How to verify the user & start the process
The security of each person’s account is paramount. Therefore, all users require verification before they are able to transact. How to verify a user.
1. Tap Verify User.
2. Ask them the following: “Will you be using a physical card, a virtual card, or entering a card number?” Tap the Card icon for physical cards or to enter the card number manually. Tap the QR icon for virtual cards.
3. For cards or card numbers, prompt the customer to: Tap their physical card on the reader. Or type in their card number. If the QR code was scanned, the card number will be pre-populated and no further action is required from the customer. Tap Submit to load the customer’s profile. If the User is Not Registered you’ll see a User Not Registered screen. Politely inform the customer and refer them to EFRC management.
4. Confirm their identity with a photo check. If a user profile loads, confirm their Name, Surname, and Photo (if uploaded). Does the photo match the customer? If so, Tap Yes to proceed to the transaction screen. If not, Tap No and inform the customer to contact EFRC management.

3. How To Process A Transaction
How to process a transaction: Note: These devices only accept manual transactions for wallet purchases. You must manually enter the amount to proceed. 1. On the Verify & Purchase screen, tap the Plus button. 2. Enter the Amount and an optional Note. 3. Tap Add – the amount appears on screen. If you need to change the amount or note: Tap on the amount again. Edit and tap Update. Important: There is no formal voiding process for staff wallet purchases. To adjust a transaction, simply edit the amount before confirming the purchase.

4. Completing the Transaction

5. Transaction Success

6. How to Cancel a Transaction Mid-Way
If the customer changes their mind before completing a purchase: 1. Tap Verify User. 2. Tap Clear User to remove their data and reset the screen. 3. This allows you to start fresh with the next customer. Tapping Cancel simply takes you back to the previous screen.

7. How to Reprint a Transaction Slip
How to Reprint a Transaction Slip 1. Tap the Printer icon (bottom right). 2. Tap OK to see the loaded slips. 3. Tap on the slip you would like to print. 4. The slip will be shown on the screen. For a Merchant Copy select the button on the right (if the slip does not print automatically). For a customer copy, tap Client Copy.

Thank you for taking the time to view this Radisson User Guide. If you have any questions or need further assistance, our support team is here to help. Simply reach out via email at support@eezipay.com. At Eezipay, we’re committed to making your experience simple, fast, and easy.
Radisson – MPT5 – Supervisor Guide
Welcome to the Radisson MPT5 User Guide for Supervisors. Inside, you’ll find easy step-by-step instructions on how to Log in, Process transactions, Reprint slips, and Verify users. If you need help at any point, please contact support@eezipay.com.
1. How to Log in to the Application
How to log in. 1. Click on the Login button to proceed with the login process. 2. Enter your user code and password in the fields provided and click on Sign In. 3. You will be directed to the main screen, titled Verify and Purchase.
2. How to verify a user for a transaction
The security of each person’s account is paramount. Therefore, all users require verification before they are able to transact. How to verify a user. 1. Tap Verify User. 2. Ask them the following: “Will you be using a physical card, a virtual card, or entering a card number?” Tap the Card icon for physical cards or to enter the card number manually. Tap the QR icon for virtual cards. 3. For cards or card numbers, prompt the customer to: Tap their physical card on the reader. Or type in their card number. If the QR code was scanned, the card number will be pre-populated and no further action is required from the customer. Tap Submit to load the customer’s profile. If the User is Not Registered you’ll see a User Not Registered screen. Politely inform the customer and refer them to Radisson management. 4. Confirm their identity with a photo check. If a user profile loads, confirm their Name, Surname, and Photo (if uploaded). Does the photo match the customer? If so, Tap Yes to proceed to the transaction screen. If not, Tap No and inform the customer to contact Radisson management.
3. How To Process A Transaction
How to process a transaction: Note: These devices only accept manual transactions for wallet purchases. You must manually enter the amount to proceed. 1. On the Verify & Purchase screen, tap the Plus button. 2. Enter the Amount and an optional Note. 3. Tap Add – the amount appears on screen. If you need to change the amount or note: Tap on the amount again. Edit and tap Update. Important: There is no formal voiding process for staff wallet purchases. To adjust a transaction, simply edit the amount before confirming the purchase.
4. Completing the Transaction
How to Complete a Transaction. 1. Tap Purchase. 2. Ask the customer to tap or scan their card, or provide their card number again. 3. The Pin screen appears. 4. Hand the device to the customer to enter their Pin, then tap OK.
5. Transaction Success
A Success screen will appear, and the Merchant slip prints automatically. Tap Client Copy if the customer requests one.
6. How to Cancel a Transaction Mid-Way
If the customer changes their mind before completing a purchase: 1. Tap Verify User. 2. Tap Clear User to remove their data and reset the screen. 3. This allows you to start fresh with the next customer. Tapping Cancel simply takes you back to the previous screen.
7. How to Reprint a Transaction Slip
How to Reprint a Transaction Slip 1. Tap the Printer icon (bottom right). 2. Tap OK to see the loaded slips. 3. Tap on the slip you would like to print. 4. The slip will be shown on the screen. For a Merchant Copy select the button on the right (if the slip does not print automatically). For a customer copy, tap Client Copy.
8. How to perform a Cashier cash-up
9. How to Draw a Daily Sales Report
A daily sales report shows all your transactions for the current day. 1. Access the Main Menu by tapping the settings button, illustrated with a gear. 2. Tap on Daily sales report. 3. The Daily sales report information will then be displayed. If you want to print the report, simply tap the Print button. 4. You will be automatically logged out after doing your daily sales report. Please note: the settings menu option is for use by Eezipay Technicians only.
Thank you for taking the time to view this Radisson User Guide. If you have any questions or need further assistance, our support team is here to help. Simply reach out via email at support@eezipay.com. At Eezipay, we’re committed to making your experience simple, fast, and easy.

